Dead Cells - Daily Run Breakdowns

15.09.2018 Daily Run Breakdown

This is really interesting Daily … it’s turret heaven at it’s best. :slight_smile:

GEAR

Symmetrical Lance - It’s just amazing this is our starter weapon for today. It lashes out insane amounts of damage and can hit behind you on the second swing. It’s great for taking care of such an area like the Sewers.

Toxic Cloud - Use it as much as possible with it’s 20 seconds of cooldown before we get to the real deal.

Sinew Slicer - It gets the job done before you replace it with the Barnacle. Drop it on a platform and move to the lower or upper one - it will get the job done.

Double Crossb-o-matic - Just a masterpiece for this biome. I can’t praise it more than that :stuck_out_tongue:

Barnacle - Really good turret because shoots vertically which allows it to cover platforms above and bellow you! Replace the Sinew Slicer with it as soon as possible and you will notice the difference in how fast it can take out enemies.

Spite Sword - Because of the crits it does when you take damage this is our boss killer weapon. On 4 Cells it takes me about 5-6 seconds to wreck the boss with this and the 2 turrets.

PATHING

It’s an interesting map, but like most of the times - grabbing the gear that will net you more kills is the way to go.

Area #1 - 2 scrolls + activate your speed buff and kill as much as possible while having the Star active - there are plenty of enemies here.

Area #2 - The odd Stars placements suggest you go first for them while dodging some enemies before you can put them out of their misery. The Sinew Slicer in the chest will help you a lot while going for the other turrets.

Area #3 - 4 Stars going this route and you have all the scrolls by this point (except the one from the cursed chest which is at the end of this area). You will get the most of your score here as well as the 2 weapons that will make the rest of the run like a breeze.

Area #4 - Grab the Spite Sword of course. There’s nothing else worth mentioning here.

Area #5 - The star is really in bad position but after it - to the left there’s nothing, except the Elite, so just run through the enemies grab the Star and go back and toss the Turrets on different platforms to get all the kills before moving towards the Elite and the Portal.

Area #6 - Nothing special here - just cleaning as much as possible.

Area #7 - Pretty simple and 3 platforms vertically so you can use both turrets on different levels to clean everything in no time.

Boss Fight - With the Spite Sword is like 5 seconds fight - forget about the Lance at this point.

At time of posting #4 in the scoreboard in 14 tries > Leaderboards 15th of September 2018

GL HF and see you tomorrow! :stuck_out_tongue:

6 Likes

28.09.2018 Daily Run Breakdown

This for sure took awhile… and I’m really sorry. I hope someone is still playing this :smiley:
I had a minor surgery last week and I was in no condition to try hard at all. Thankfully I’m not on painkillers anymore so I can drin…PLAY the game as usual and kick some ass. Hopefully I will be able to play everyday at least for few weeks now if I don’t start to fall apart or something :slight_smile:

GEAR

Balanced Blade - This is our starter weapon and unfortunately isn’t one of the best swords, because of it’s really weak breach damage but soon we will move on to far better one.

Barnacle - Like always it does wonders here so pop it up constantly during the whole run.

Phazer - It helps a lot closing the distance really fast and in the Castle it can save you on plenty of occasions, because it teleports you behind the closest enemy. It’s only 3 seconds of cooldown so use it whenever possible. It will provide faster travel time and lots of extra damage.

Swift Sword - This will be the main weapon to finish the run and the only thing you need to concern yourself is keeping that speed buff as much as possible to maintain the critical strikes rolling.

Bloodthirsty Shield - I used it only for the boss fight, because it’s really hard to kill every enemy today and the time is scarce. It took me about 20 attempts to find the proper pathing to be able to kill the boss for the first time :slight_smile: .

PATHING

Area #1 - There are 3 Scrolls near the first Portal, so if you don’t feel comfortable you might circle around and grab the one above it just in case and get large damage boost before clearing it out.

Area #2 - To make use of the star I’ve given you the basic pathing here where the white arrow means you don’t kill enemies at all and the blue one suggest you need to double back for them after the Star for maximum score. There are only 6 enemies here and a single Chest so make sure you add +35 points via the Star.

Area #3 - The last 2 scrolls and one is in a Cursed Chest of course. The interesting part is that here we have plenty of enemies around the Star so first grab it and than start killing everything.

Area #4 - Nothing too fancy here. Pick up the shield if you want an easier time with the boss though.

Area #5 - This area is counter intuitive. You need to skip and dodge plenty of enemies and go back down after picking up the Star which is pretty high above. This is a huge time waster, but we can’t compete without this extra score.

Area #6 - As simple as it can get with a minor waste of time to make the Star work as well.

Boss Fight - Parry him few times if you grabbed the shield and the Barnacle + Phazer should make a quick work of him.

At time of posting #7 in the scoreboard in 28 tries > Leaderboards 28th of September 2018

GL HF and take care guys!

8 Likes

Thanks for doing this! Really appreciated, as always. :blush:

As for your surgery, and somewhat off-topic: how are you feeling? Was recovery as smooth as the process itself? I hope so, man!

Enjoy some alco- games for me! I’ve been a bit busy so I’m steering away from Steam for a few days – not alcohol, though, never alcohol.

See you around soon-ish I hope and enjoy Hollow Knight. :wink:

5 Likes

Thank you very much and you are welcome! :smiley:

Welp… it isn’t something major - Underskin mass got infected and had to be removed, but it’s placement is what bothered me. It’s on the upper joint of my leg … 5 centimeters next to my… well … :smiley: It was there sitting harmlessly with the size of a pea for year + and back then the doctors told me it’s “nothing” and no one wanted to remove it until now when it grew to the size of a walnut with a different colors on top of bleeding etc.

The funny part is that the surgery was with local anesthesia so it was far worse than the ongoing recovery, but still not worse than my dentist :smiley:. I still have problems moving around only 'cuz it’s in such a bad spot but I kinda got used to it.

I hope you will be back into some action soon @coralinecastell and cheers btw! :stuck_out_tongue:

4 Likes

30.09.2018 Daily Run Breakdown

Prisoners’ Quarters

GEAR

Spite Sword - The better option compared to the Rapier - it has decent moveset and it does good job until the next weapon.

Death Orb - It’s really slow, but does insane amounts of damage. Because this is the Prisoners’ Quarters it’s important to remember 2 out of 4 enemies jump towards you - zombies and shieldbearers. This means when you want to deal with those cast it from a bigger distance and get out of their sight so they don’t charge through it and eventually survive.

Sinew Slicer - It’s doing decent job with those low health enemies so throw it as much as possible, but stay near it because it has pretty short link to your character to be operational.

Swift Sword - Even more amazing for such low HP area. It’s destroying everything without issues as long as you maintain the speed buff for the crits.

Barnacle - The best turret you can have for this area.

Hokuto’s Bow - Probably won’t drop in lower cell runs, but don’t worry. I used it only to shave off few extra seconds out of the boss. It’s great bow though, but it shines mainly vs healthier enemies and not in this area.

PATHING

Area #1 - It has plenty of enemies, but the thing is … there’s not enough time so keep on the main road and utilize the stars there. If you go up or down you will lose plenty of time. Don’t forget to go for the secret in the far left though +20 pts.

Area #2 - Pretty straight forward so get some Death Orb kills to the left after you get the star. Swap to the Swift Sword of course as soon as you reach it.

Area #3 - Nothing fancy here except the skill scroll and the chest.

Area #4 - The last 2 skill scrolls (1 in a Cursed chest) where you can grab the first one before going to area #3 (it’s up to you). 4 Stars though… so this should be your highest score area and they are positioned so you can go from one to the other and always maintaining +5 pts.

Area #5 - Curse clearer.

Area #6 - Nothing interesting.

Boss Fight - Without the Hokuto’s Bow this was tedious fight and took above 15 seconds.

At time of posting #11 in the scoreboard in 10 tries >Leaderboards 30th of September 2018

GL HF and take care! :stuck_out_tongue:

5 Likes

Glad to hear you are better.:hugs:

BTW am enjoying the read…:star_struck:

4 Likes

01.10.2018 Daily Run Breakdown

Toxic Sewers

GEAR

Hayabusa Gauntlets - The better option compared to the Rapier just like yesterday this garbage was laying there - short reach and really bad breach bonus. The four hit combo takes a while to wind up for the last overkick which is the only good part of this weapon because it hits behind you as well and deals with flying enemies pretty easily. You can chose instead the Frantic Sword right in the start instead of Hokuto’s Bow, but being so easy area I couldn’t find myself being able to lose 50% of my HP without wasting tons of time.

Powerful Grenade - It does pretty decent job stunning the Worms or the scorpions early on and when you go to +6 stats it should take out everything in one toss. The lack of better alternative cemented it for the whole run.

Double Crossb-o-matic - As you might already know it’s my favorite Turret and does wonders in this biome (actually in every biome).

War Spear - It’s really amazing here… no questions asked. Just forget about the gauntlets after you pick it up.

Hokuto’s Bow - Does amazing job in this biome effectively increasing your DPS with additional 75 from all sources for the next 10 seconds while the debuff can spread to nearby enemies. This means one arrow in one of the enemies can lead to easy wipe of whole area if you find the correct order of taken down the enemies one by one. I wanted to grab it earlier because it will definitely speed things up, but the problem was I had trouble clearing my Curse and this area felt the best to do so and I didn’t wanted to just run and grab it and go back, which now sounds like pretty doable and should try that strat later.

PATHING

Area #1 - Grab your first Skill Scroll and kill some enemies…

Area #2 - You will get all the extra gear from this area making your run a breeze if you don’t forget to utilize it. At the end you even replace your starting weapon + an extra Skill Scroll. Can’t get any better than that early on. Don’t forget the gem (after the Scroll) and the Star via the teleporter in the next room though.

Area #3 - Poorly placed star that requires dodging the 5 enemies there and going back for them for +25 extra pts and +5 extra for the cursed chest.

Area #4 - Like I mentioned in the Gear section I felt this is the best area to clear my curse safely and it’s pretty packed so the star should net you more than +60 pts easily.

Area #5 - To get to this area you will have pretty long climb which is typical situation for this biome. On the way you will have random Elite roaming around (at least at 4 cells active), a small gem and the last 2 Skill Scrolls. Kill as much as possible without wasting a lot of time and take advantage of the stars of course.
The last star is yet again poorly placed so you will have to loop around with it.

Area #6 - AGAIN awful placement for a star. Those 3 Stars probably cost in total of 20 seconds of lost time, but it is what it is. Here is the only secret I managed to find so get those +20pts with the star for extra +5.

Boss Fight - Hokuto’s Bow, just like yesterday makes the fight a lot shorter and the constant firing from the turret makes this fight about 6-7 seconds long.

At time of posting #3 in the scoreboard in 8 tries >Leaderboards 1st of October 2018

I will probably be deranked really soon because it’s mid day for the Daily, but I doubt I will be out of top 10 or even 5 if I do 3-4 extra attempts later on.

GL HF and take care! :stuck_out_tongue:

P.S. I’m glad you are finally back @delenn13 and hopefully you had a blast in your vacation!
I bet you can be an amazing Tryhard so start rolling already! :stuck_out_tongue:

7 Likes

02.10.2018 Daily Run Breakdown

PRISON DEPTHS
This is level 3 biome and a lot of people are scared from it. It’s probably the hardest area you can acess in the regular game mode early on - it can be your 3rd area right after the Promenade of the Condemned (not available for Daily runs) and leads out only to the Ossuary which makes it the only possible extra area so far in the game. This is the only place that extends the regular playthrough with + 1 biome if you wanna go the slowest playthrough possible.
It’s not that scary at all, but some practice is required and what better opportunity you can get instead of playing the Daily run a bit?!

Enemies

The familiar ones from previous level Biomes are the Zombie and the Kamikaze so no point in addressing those here.

Thorny - Low HP pool, but as annoying as it can get. Their backs are protected with spikes, so hitting them from behind will damage you, but still damage them as well. The Thorny has only 2 attacks and thankfully one of them is rarely used. What they usually like to do when see you is to start up really long wind up animation that leads to “Sonic the hedgehog mode” and they are really vulnerable while they wind up and it’s easily interrupted. The second attack as rare as it is, it’s really annoying and it’s triggered when you are really close to them and they didn’t had the chance to start the first one. It’s short backwards hop which often aligns them with their back towards you so you need to roll through them to face their unprotected front side. The worst part is this one is way faster and they have short recovery time so if you aren’t fast with your attacks they will turn their back against you yet again. After some practice you will find them as harmless as Shieldbearers and they are easy provider of +5 pts. Don’t forget you can dodge through everything they do and easily jump over them (not even double jump required) because of their small size.

Slasher - Considered by most players as the most dangerous and even one of the hardest enemies in the game I beg to disagree. They have only one attack pattern which consists of 3 sword slashes and the third one launches a fire shockwave coming from the ground in half a screen distance. The only thing that works for them during this combo is that they can turn around towards you in between their hits when you dodge through them or jump over them. Safe strat is dodge through them all their attacks and they are really vulnerable after the shock wave. You can even single jump above it staying on their front (no double jump required). Dodging like that is huge time waster on a Daily run so when you get used to them start throwing a hit before each dodge (if you aren’t going with really slow weapon of course) and if the weapon has decent breach multiplier you will break their slower third attack after 2 or 3 hits and making them easy kill.
The only other thing they have going for them is a blinding fast dash towards you which is welcomed in the Daily, because they present to you opening opportunity instead of having to chase them down. Giving you +6 pts seems right.

Masker - They have no attacks at all so they are harmless on their own, but the danger comes when they are protected. Covering a large area around them with fogs that renders all enemies invisible can be really annoying, especially when they aren’t that easy to reach, because this spell works through walls of course. When you get in their range make sure you have your crowd control gear ready and your dodging skills are sharp because they are often surrounded by powerful and heavy enemies. +5 pts for those.

Hammer - Those are only placed in the Prison Depths. Now that’s really annoying enemy if you don’t have enough damage output to take them out quickly. They have only 2 attacks. First one is a ground slam so if you are underneath them you will get hit and this move is always followed by 4 bombs release around you. Because of the slow fuse you will have some time to land few hits before having to jump out of the bombs range and because they explode one after another in a random sequence dodging in any direction isn’t advised - double jump out of there if you don’t want to tank the damage. The second ability they have is spawning 4 Corpse Flies (they do reset your speed buff so take advantage of that little fact) which is even more annoying than the first one. You might think ranged weapon is the way to go against them, but if you don’t have piercing or AOE the flies will start to block your projectiles pretty soon and you might get overwhelmed by flies and bombs at the same time. Having high damage output before engaging is the best way to go if you want to kill them unscathed.

GEAR

Torch - The good old Torch is our starting weapon and for me was the only weapon throughout the whole run. Having an Oil Grenade early on made every other option obsolete.

Sinew Slicer - It gets the job done by bleeding out everything and keeps the Slashers occupied. :slight_smile:

Oil Grenade - I couldn’t wish for something else in this run… really. It takes out most enemies on it’s own when you get all the scrolls and clears the masses of flying enemies even early on. No need to mention the insane damage it provides after you ignite the oil with the Torch.

Welp… that is all folks :D, at least for me. The other starter choice is Twin Daggers, which have really slow wind up for the last critical hit and in one of the chests there’s an Alchemic Carbine - I didn’t bothered to pick it up, but if you think it can shave off some seconds from the boss fight - go ahead and use it.

PATHING

It’s really complicated run as far as reaching the highest scores possible is concerned. There is even more looping around utilizing the stars than the previous daily and few long distance runs that waste valuable time.

Area #1 - Of course start it by grabbing the Sinew Slicer and do a quick drop below the first portal for the Oil Grenade. The 2 Skill Scrolls so close to the start provide pretty good head start as far as damage is concerned.

Area #2 - The Elite is just roaming there below the second portal on 4 Cells active. If you have him in your runs it’s good idea just to aggro him, so it teleports after you and it’s not hard to lead him to the star area and do the killing there for extra points while being on the move saves you a lot of extra time.

Area #3 - Plenty of stars here so try stacking them as much as possible and loop around to take care of the enemies with the first one being active. Right before the chest there’s the only secret I managed to find.
At first I considered this to be area #5 and the Cursed chest one being #3, but doing so you will waste a lot of Star time running below the portal between #3 and #4 on the current map you see above.

Area #4 - Grab the star without killing anything when you get to this part. Right after kill the zombies next to it and do a quick jump + Sinew Slicer throw next to the Skill Scroll. The turret will take few enemies while you get the scroll and drop down beneath to move further for the next zone.

Area #5 - That’s the most complex area as far as utilizing everything possible goes, so I will try to break it down as clear as possible. The gem drop is from a Kamikaze bat so be careful not to make him explode. The platform above it has a Masker which is a must clear at that point. Skip the scroll drop platform above and go straight for the star which is after a Vine rune, than you can go back and clear those enemies really fast with your gear and pick up the scroll. The star is still active so I go and do a quick roll through the Elite’s door so I only activate his slow spawn animation and than drop down to kill whatever possible on the platform below while I still can get +5 pts. Now you can go back up for the Elite and again it’s preferred just to aggro him further below where you need to skip all enemies possible before taking the star and looping around. At this point only the cursed chest remains and your speed buff is done for at this point.
It also contains the last 2 skill scrolls for maximum damage so I thought it might be better in the long run to go through it compared to straight running for area #7 instead. I might be totally wrong of course. :smiley:

Area #6 - I decided to go first here (right before the boss) because first - there are exactly 10 enemies to clear the curse and second - the portal to get to there is way closer than the options for area #7 and here you will reactivate your speed buff with no problems so you can run the long distance to #7 way faster.

Area #7 - After some strolling that seems like forever you are in the last area which isn’t something special. One star, one chest and don’t bother with the portal because it leads to single Kamikaze and Grappling Hook, which is useless for this biome.

Boss Fight - Shouldn’t take you more than 10 seconds with that gear.

At time of posting #2 in the scoreboard in 10 tries > [Leaderboards 2nd of October, 2018]

GL HF and take care! :stuck_out_tongue:

Updated the OP to include the Prison Depths Biome info and it’s enemies, but this thing is absurdly long at this point. It’s a pain :smiley:

6 Likes

Still trying to get through the game on 1 cell. Actually reached the final battle for the firs time last run. But that damn elite caster got me, shot me once and then he managed to shoot again while I was still in recovery animation and dead instantly.

6 Likes

The minions that the Hand of the King summons are way more annoying than him, because his attacks don’t change at all with the difficulty. I really feel you on this one, I’ve died more to the summons than the boss himself :slight_smile:

6 Likes

05.10.2018 Daily Run Breakdown

I’m sorry for not posting the last 2 days, but the daily runs were pure cancer recently. Yesterday I couldn’t even finish in top 10 after probably 50-60 tries and managed to hit only #17 in the end of the day. I will give you a glimpse why, but won’t explain it. I will just add that the map layout was total cancer.

Previous day cancer!

Let’s get to today’s run because it involves a lot of running around AGAIN, but it’s far more forgiving and has plenty… really plenty of gear and options for every taste :stuck_out_tongue: It’s one of the most interesting and diverse daily runs I’ve done so far.

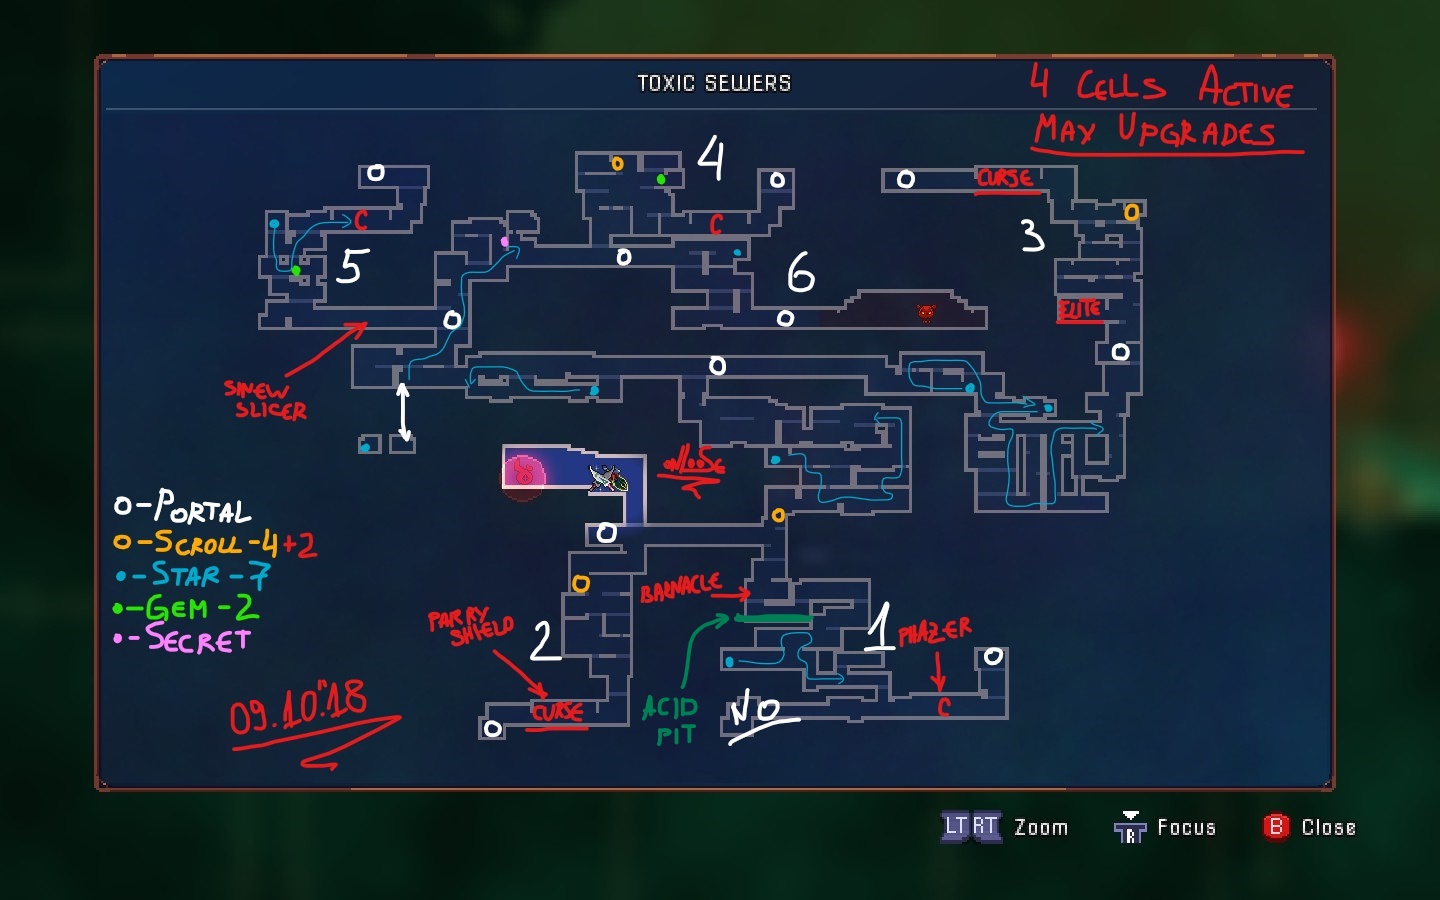
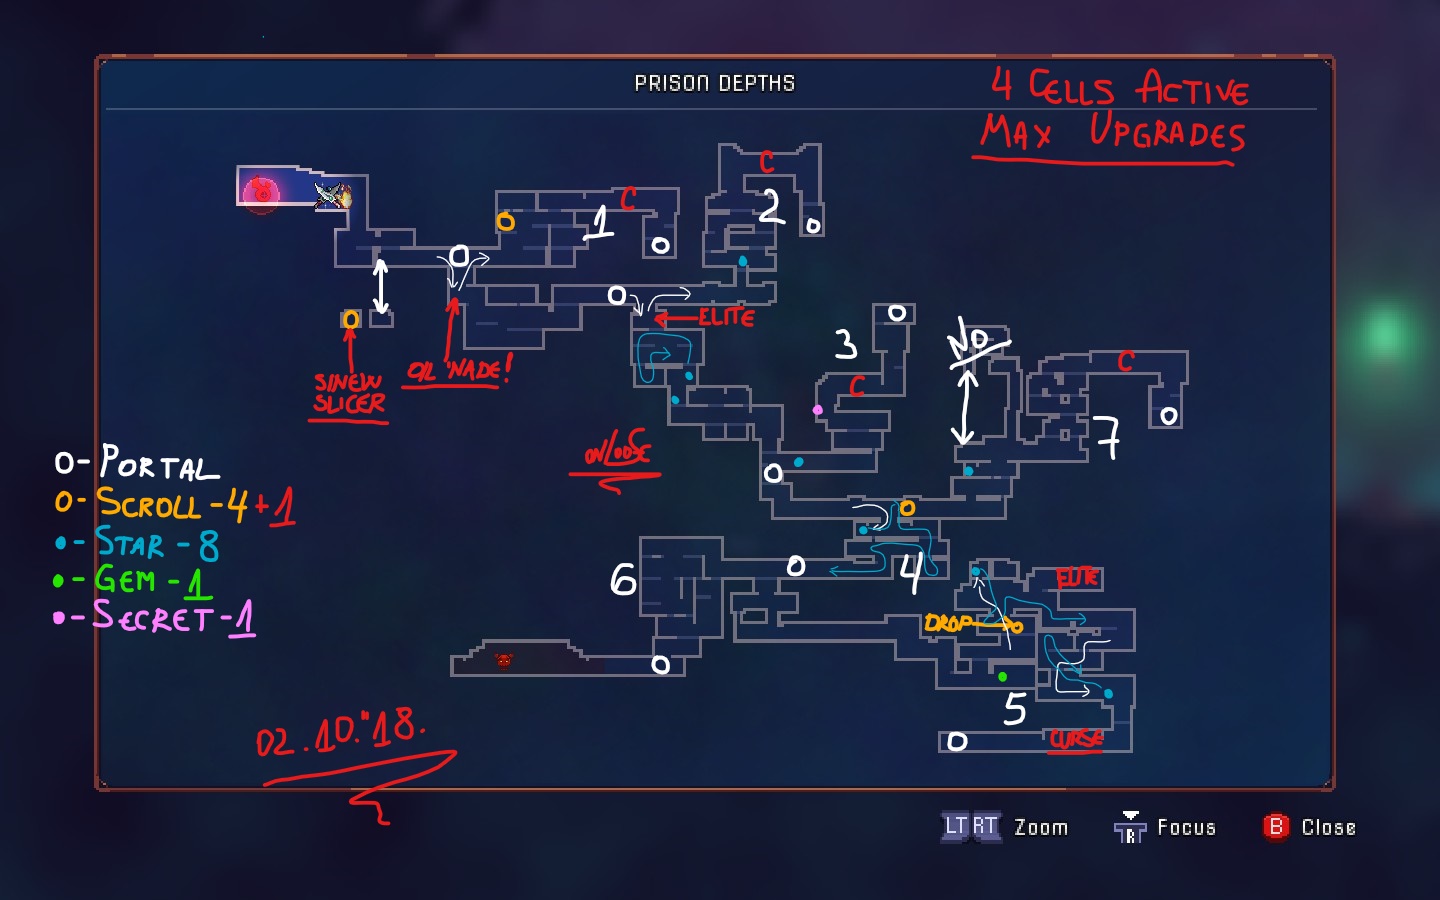
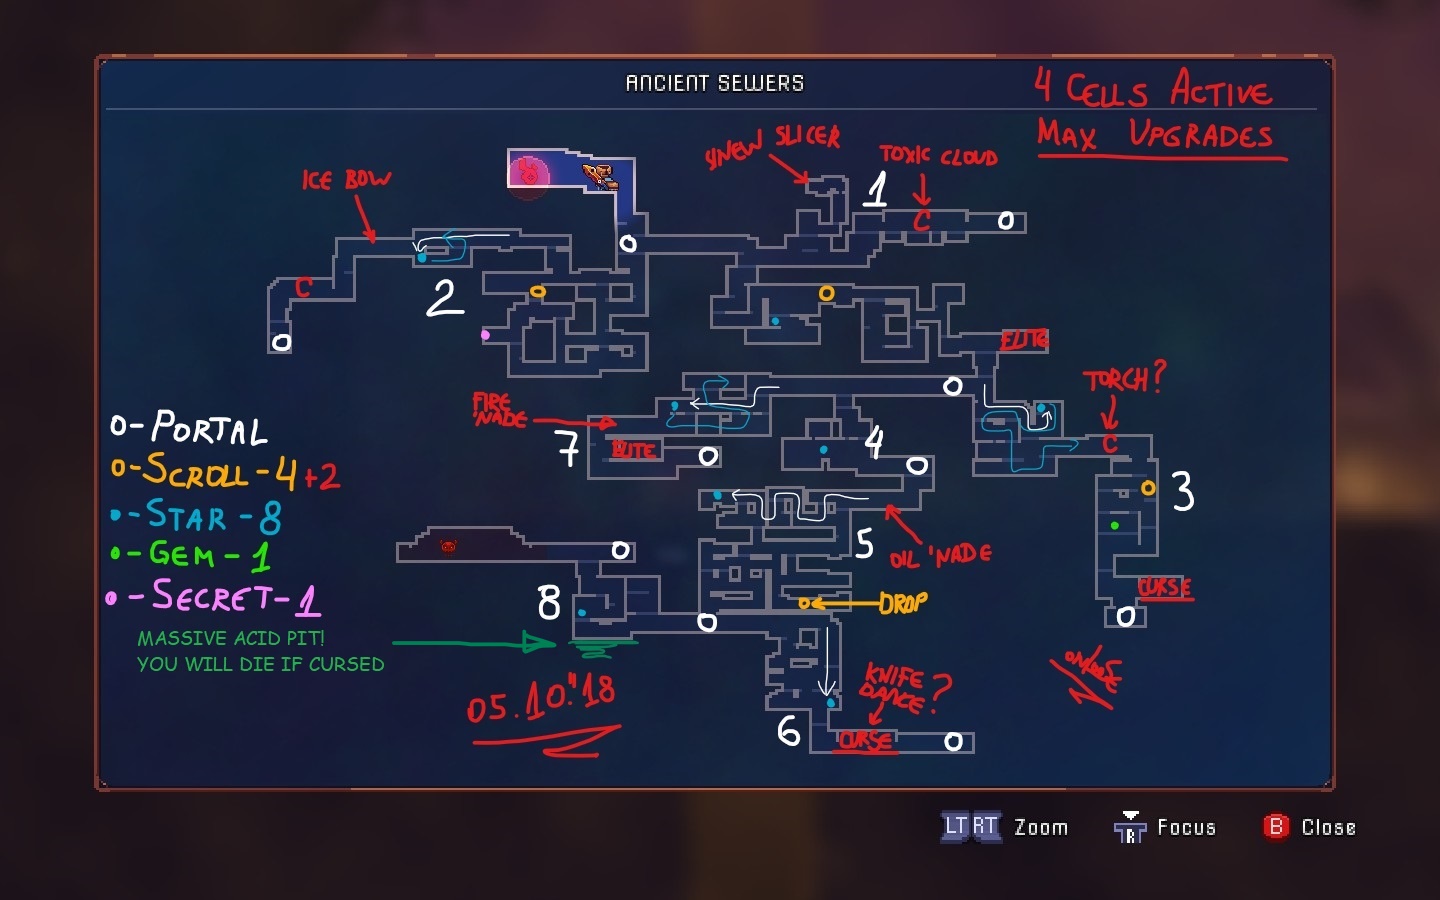
If you are not that familiar with the Ancient Sewers biome you might wanna check my explanation and enemy breakdown in the Biome section in the OP!

GEAR

Spiked Boots - I decided to choose them over the Spiteful Sword for number of reasons as a starting weapon. First of all I know it’s not that hard to get damaged in this biome to utilize the sword, but the boots land critical hits constantly. The trigger is to hit an enemy that is starting his attack towards you - this is basically all the time and of course it does wonders against the boss (you can easily just tank his damage and just press your attack button)! Also they have a special ability - like all boots they can kick enemy projectiles and turn them harmless for you, and on top of that they now can damage enemies! We have plenty of Disgusting Worms in the sewers so why not take advantage of the bombs they drop after being killed?! Kicking those bombs in the faces of your foes does insanely quick work of them.

Sinew Slicer - The first gear pick up that will save you a lot of time while you just toss it among enemies and fight on the next platform while they bleed out. Only 10 seconds of cooldown like every other turret is just amazing.

Toxic Cloud - It can get rid of the pesky flying enemies pretty easily and it’s worth it to drag it along for a bit… you will open the chest anyway, so make use of it.

Ice Bow - Not really useful or practical for a Daily Run, but it has some advantages here. It kills the Kamikaze fliers with 1 shot of course while the Spiked Boots aren’t that helpful against them with their short range. This bow can lock enemies in places for maximum advantage. Few times in the run I used it to lock Disgusting Worms in place from the other side of the screen so they can’t move until I get there to take advantage to kill more enemies by kicking the bombs they dropped. Also don’t forget you can freeze the giant mushrooms called Spiker, which have plenty of health and a really annoying attack.

Oil Grenade - I replaced the Toxic Cloud with it without even reconsidering. It does less damage, so it doesn’t kill as well as the cloud, but it only has 8 seconds of cooldown (instead 20 for the cloud) and there’s a Fire Grenade eventually and even a Torch if you wish to go for, which I will talk about in the extra gear section below. This still takes out the flying enemies pretty easily or the worm spawns from the Purulent Zombie.

Fire Grenade - So far the Sinew Slicer was doing pretty good, but having the oil 'nade on the other slot makes this beauty a must pick. It’s shame we take it in the end of the run but I will address this issue in the Pathing section down below. The turret is pretty useless for the boss anyway, but this grenade totally destroys him.

Extra Options

Torch - It’s here, just laying in a chest. You might want to give it a shot if you feel more comfortable with it, especially when there’s an Oil Grenade. I didn’t went for it, because it’s a bit slower for brutality weapon and lot slower than the starting boots.

Knife Dance - It might be a great option too, but I wanted to do the Fire/Oil Grenade classic combo for fun. Also 20 seconds cooldown might be tad much for the run. Doesn’t hurt to experiment though!

PATHING

There’s a lot of running around and empty corridors. Don’t expect to be able to kill 3/4ths of the enemies, even 2/3rds is really hard. The 2 Cursed Chests make the pathing really constrictive. I would have loved to get the Fire/Oil Grenade combo as early as possible, but this run just didn’t let me. That is of course if I didn’t wanted to run without gear for ages and waste tons of time.

Area #1 - We need that gear to make it easier so this is a must to go place right at the start.

Area #2 - You may try to use this area to clear your curse from one of the chests later on, but I found the Ice Bow more useful early on and this Skill Scroll helps a lot to start with more damage.

Area #3 - It’s faster to go there instead to the left corridor because it’s straight ground slam drop. Taking the curse at this point is advised, because there aren’t much places to clear it left, what about the second one that comes later too?!

Area #4 - Nothing special, though you better pass on the enemies that are at the start of the drop to this area only to loop back up with the star for extra points. You should have few seconds of the star still active entering Area #5 for few quick kills after you pick up the Oil Grenade.

Area #5 - As you can see it on the map it’s the biggest room in the run and it contains tons of enemies. It’s not worth it to waste all your time here though. Grab the Star and head down to the right towards the Skill Scroll and get out.

Area #6 - Not much enemies here for the star unfortunately. Drop down pick it up and kill the 5-6 beings roaming around than you can get cursed.

Area #7 - I had to leave this for last because it’s not possible to lift up this SECOND curse before the boss. It’s really packed area so you will get tons of extra score from the second elite and the star when you loop around. Just make sure to take out the Spiker before doing anything else if you are cursed.

Area #8 - The huge Acid Pit was really unpleasant surprise, but it is what it is. Whatever you might try you will get damaged by it and like in Area #6 you have only handful of enemies to use this star except you have time to get back to the right side of the acid pit, but this is doubtful.

Boss Fight - The Spiked Boots totally destroy him and like I said in their paragraph - you can easily tank him with them for extra damage, just taking the hits like a true man lol :smiley: . The Fire/Oil Grenade combo devastates him as well and don’t forget to freeze him with the Ice Bow when he winds up for the jumping attack - this is his way of wasting your time ;]

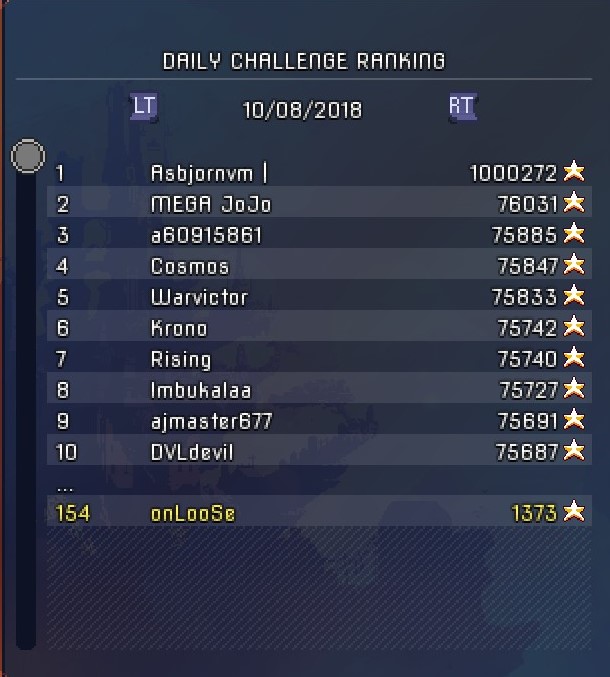
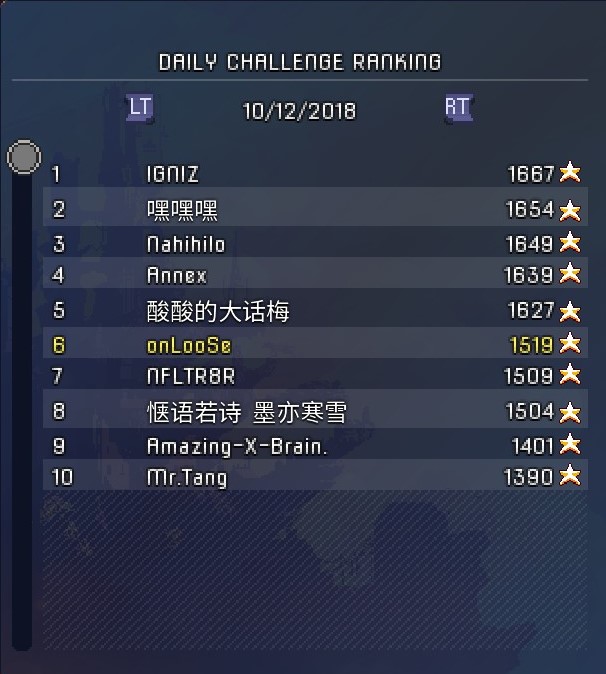
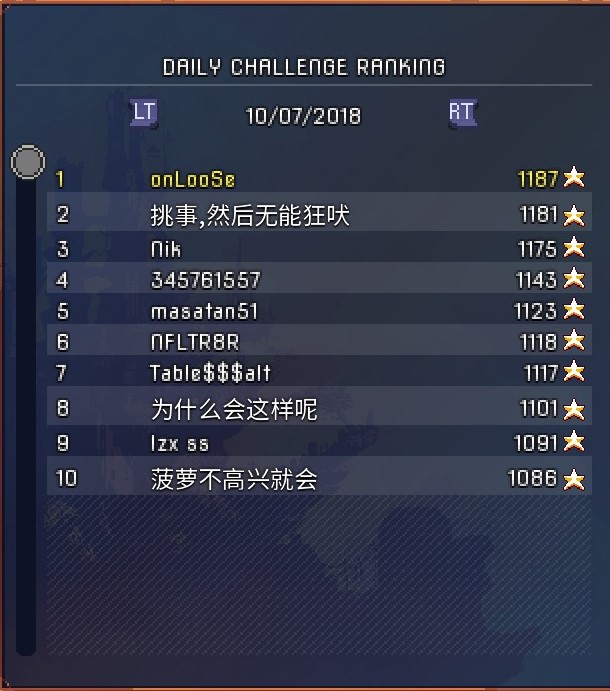
At time of posting #5 in the scoreboard in 9 tries > Leaderboards 5th of October 2018

GL HF and cheers, because it seems it’s a beer day according to the guys in the New coin shop games topic! :stuck_out_tongue:

8 Likes

07.10.2018 Daily Run Breakdown

My first #1 so far and there are only less than 5 hours left… I wonder where are the most dedicated cheaters tonight.

I really don’t have a lot of time tonight to cover the Biome in general, and I will eventually - the enemies here are pretty interesting and have game changing mechanics tied to them, so I will just mention few basic things for now:
This is version 2 of this biome, which means it’s the enemies that wake up from their slumber after you press the button on the regular map in a normal run. This is probably one of the most unforgiving bioms so don’t expect it easy on you.

Golem - If a they see you - there’s no escape. He has the ability to drag you from wherever you are on the map towards him, which might be insane time loss. Sometimes you might figure out to use this ability to help yourself traveling back to his position, but for this to be helpful… it’s 1 in 100 situation. They aren’t covered by the Protector thank God!
Protector - covers all enemies in pretty big area around him with invulnerability shield. The shield pulses, so it has a down time, but it’s every 4-5 seconds so make sure you take them out first - lol most of the times you won’t have another option :smiley:
Don’t forget the Golem is +10 pts and the Protector is +5 pts while everything else is 2 to 3 pts.

GEAR

Spiked Boots - I feel they are far more valuable than the Impaler on this biome, especially being version 2. They really helps against the Golem enemies. Until you get the Throwing Knife though you might have some issues with the Kamikaze flyers. You might already know, but I will mention it just in case - they do critical hits on interrupting enemy attacks - this is the description, but it’s not quite correct - they do crits while the enemy is doing an attack animation (even wind up), so they destroy the boss if you just tank him.

Sinew Slicer - Best option for the run. It bleeds out everything including Golems while you dodge them.

Wolf Trap - It’s pretty useful here because it locks in place 2 enemies and can even kill Kamikaze bats if you touch them with the throwing animation. Locking Golems renders them helpless if you go behind them and not only that, but we have 2 ranged enemies here and they love to back off - locking them in place will save you a lot of chasing. Don’t forget if the locked down enemies are facing you they can still attack you, so always dodge behind them.

Throwing Knife - It’s an really amazing weapon and I didn’t had the chance to talk about it before, (I think) so here we go. It’s low initial damage, but the bleeding DPS stacks really fast - 2 or maybe 3 fast knife throws and most enemies will bleed out. If you don’t forget to throw at least one at Golems you will have far easier time with them and the same applies to Protectors - they are a bit tanky too. This thing has amazing auto aim so use it against flying enemies every time and you can even throw few knives on enemies on other platforms when you are staying on an edge.

Barnacle - Replace the Wolf Trap with this turret if you feel like needing more DPS. For me it was easy pick up, because I don’t have much trouble with the Golems anyway. If you want to be on the save side don’t pick it up, but I doubt you can climb up much on the Leaderboards. Higher risk - high reward.

PATHING

This one is not easy in every stretch of the imagination. I skip plenty of enemies, because there’s no time at all. I mainly try to run from gear to gear and from star to star of course.

Area #1 - You can see from the map that I skipped almost every enemy here, except the Golem, because I can’t get unnoticed and his ability to pull me towards him will be huge time loss. 2 pieces of Gear and I really needed the extra stats from the amulet from the Elite to be able to fight properly in this insanity.

Area #2 - Good start with +2 to stats by the *Skill Scrolls. For the second one I kill only the Golem and the Protector - everything else is waste of time.

Area #3 - Another damage boost and again lots of enemies that will waste you tons of time if you think you might take full advantage of the first star - you won’t have enough time to finish the full run for 4:30. Don’t forget to get the gem (+the kill for it) and the secret with the second star active. The second Elite was a Golem for me which is +50 pts on itself - 10 pts (base monster value) x 5.

Area #4 - Drop down to get the Throwing Knife and you can start immediately to put it into use.

Area #5 - This is really long and messy run including 3 stars in it’s first part + the Barnacle turret and than really long distance towards the last free Scroll. When the last of the initial stars ran out I just made a run for the Scroll without stopping at all, just tossed few turrets here and there to keep my speed buff if they managed to kill something on the way. The last room before the Cursed Chest is really packed with enemies and you will have to loop around as much as the rest of the time on the clock allows you for maximum score with the star!

Area #6 - Can’t really clear the curse and the star is almost at the bottom, so be prepared to drop right for it and you have to be on your toes to survive using the star.

Area #7 - This one is pretty simple. You will clear the curse on the Protector that’s pretty close to the start of the Area and than it’s the boss.

Boss Fight - Because of all the bleeding gear I used during the run, the boss fight wasn’t one of the fastest ever… For sure it’s more than 11-12 seconds this time, but the Spiked Boots helped a lot!

At time of posting #1 in the scoreboard in 33 tries > [Leaderboards 07.10.2018]

GL HF and take care! :stuck_out_tongue: It’s pretty good day it seems…

8 Likes

Congrats on getting to the #1 spot!

5 Likes

Thanks buddy! I have no idea how I managed to hold it and what really happened to the cheaters there :smiley:. It’s a mystery, but I was prepared to try to get +30 pts at the end if someone had passed me and if they would have been enough to reclaim #1. It’s good I didn’t had to push it more, because I managed to doze off when there were hour and a half left :rofl:.

6 Likes

Strange things are happening to the Leaderboards today

I still have no idea what’s up, because there wasn’t anything in steam discussions nor reddit for today, but I will try to sum it up according to my experience throughout the day.
Early in the morning I decided to start by making the map and saw that there were 6-7 ppl with 75 000+ score, so I was like “oh goodie - there might be a Philosopher’s stone in this run” (which provides of course 75k pts and most of the time only 2-3 cheaters spawn it in their game). So I did like 5-6 runs and started to work on the pathing to get higher scores and what I noticed is that I was killing everything … no Philosopher’s Stone to be found anywhere and I was at rank 60-70. I checked the Leaderboards official page and saw that everyone in it (shows only the top 50) has 75k + and of course there’s an excuse of a human being with 1 000 000 + ! By this point I knew it’s a rip for today.
I had to go do stuff and around 15:30 GMT I checked the leaderboards on my phone. For my surprise they were all whipped and only 7 ppl had played. I really hope this is finally the long waited attempt from the devs to do something about the cheaters, but at this point I really doubt it. When I got back home - the in game leaderboards are as they were in the morning… even worse >


And when I do new run I don’t show up at all in the official ones >
https://dead-cells.com/daily/ranking?date=2018-10-08&first=false

Which still have like 39 entries and what this means is that probably the Motion Twin database server restarted for the day ;]

The good news about you guys is that if you want - you can go top 50 right now even with making 2 points and straight up dying :smiley:, but I hope there’s someone that would want to use the map to get something tad better! The only catch is that if you have played the daily today, you probably wouldn’t be able to get a rank in the web page Leaderboards ;]

I won’t go into details, because there are only 2 hours left and really no details are required… it’s the first biome!

08.10.2018 Daily Run Breakdown

Really simple run so take advantage of it if you want. It’s the starting level after all and it’s easy to kill every enemy in this daily run.

GEAR

Spiked Boots - Again! We talked about them on plenty of runs, so just use them! :slight_smile:

Throwing Knife - Again!

Toxic Cloud - It will help you a lot vs the low health clusters of enemies in this biome, until you replace it with the Barnacle for more DPS.

Fire Grenade - Like in plenty of previous runs - it destroys everything. Let’s not waste time with it!

Torch - You know it pretty well like everything else… either you take it if you feel more comfortable or just don’t. I took it and it saves me more time compared to the boots.

Barnacle - Really good turret because shoots vertically, which allows it to cover platforms above and bellow you! In this case it will help you for the last area and increase your DPS in the boss fight.

PATHING

Area #1 - Right up from the start going there will provide you with the 4 FREE Skill Scrolls and 2 pretty pieces of gear. No stars, no shit… pure fun.

Area #2,3,4 - All connected, going down from the first teleporter. You can grab the Torch if you want, but definitely grab the Throwing Knife. It includes 3 stars, 1 gem, 1 secret, 1 Elite and my favorite - 1 Cursed chest for the last +1 on every skill. Pretty easy :stuck_out_tongue:

Area #5 - Just the perfect curse clearer, nothing more.

Area #6 - It has like 5 enemies so take them out and open the chest… that’s it.

Area #7 - Grab the Barnacle and start using it with the 4 stars and the last secret left. A lot of enemies cramped together = tons of points!

Boss Fight - With the Torch, the bleeding of the Throwing Knife and the Barnacle you should take him in not more than 10 seconds.

At time of posting #Damn Cheaters in the scoreboard in 8 tries… RIP

GL HF and take advantage of this!

8 Likes

1 million points? Hold my beer, wait, I don’t drink beer…

hold my juice.

6 Likes

is that fermented grape juice?

6 Likes

So, I got answers from only one person in the discussions and I don’t know how reliable he is, but what he says makes hell of a sense:

There was philosopher’s stone, which I somehow missed and trust me… I looked everywhere for the damn thing.
The #1 guy found exploit (I guess it’s tied to the philosopher’s stone somehow) which he… maybe… reported, but I couldn’t find where he actually reported :slight_smile:

Everything is normal and bit buggy than :smiley:

7 Likes

New Beta branch update divided the leaderboards

Basically that’s what happened yesterday. Motion Twin pushed out an beta branch update and if you play on it you will be on the official web page leaderboards.
Patch notes for 8th of October 2018
No major changes, but until this goes live into the standard game build you won’t register on the Daily run Leaderboard

Here’s the official guide how to do it if you want and to copy your save file if you want to go back in the standard build, because… well everything is explained by the devs >

How to access the Beta Branch (PSA: Back up your saves)

There are far less people that opt in for the beta and from what I see - no cheaters at all!!! You will have far more pleasant experience here! And you can always revert back… it’s 7 MB download when switching back and forth!

It seems now I have to run both until the patch goes live, but it’s only 1-2 extra runs 'cuz there’s nothing game changing for the dailies and it’s exactly the same run of course :slight_smile:

09.10.2018 Daily Run Breakdown

Toxic sewers biome so stay sharp and always ready to dodge/jump to avoid all the annoyances :slight_smile: It’s pretty low health enemies, because it’s level 2 biome as you might know, so it isn’t difficult overall.

GEAR

Sadist’s Stiletto - You have a choice here between this, Twin Daggers and right below the first portal next to the start there are Assassin’s Dagger and Broad Sword(too slow in my opinion). I hate the Twin Daggers in general, not like they are really bad or something… just a tad slower for my liking. I could have went for the Assassin’s Dagger, but I’ve played far too much in regular runs with it so I wanted to do something a bit different with the Stiletto. It’s really good and fast if you manage to activate it’s critical strike multiplayer - which is +50% damage on bleeding or poisoned target. It’s funny that I barely got to maximize it’s damage, because I made my pathing to take the Sinew Slicer really at the end of the run, but it got the job done never the less.

Barnacle - Really good turret because shoots vertically which allows it to cover platforms above and bellow you! (Probably I copied that line too many times by now)

Phazer - It does wonders here in the Sewers, because allows you to jump from an enemy to the next on different platforms without wasting time for jumping and what not. It can be a real saver from time to time when your speed buff is almost depleted and you find something to reset it from on the edge on the screen. This is why I kept it for longer. I’m getting far better scores with it instead of the Sinew Slicer early on.
Don’t forget it’s instant synergy with the Assassin’s Dagger, because it teleports you behind an enemy and buffs your next attack while the dagger does crits from behind.

Sinew Slicer - You know it… the turret that causes bleeding to your enemies, but in this case it even activates the crits of your Sadist’s Stiletto dagger, so this combo really destroys the boss. If you opt out for another main weapon… than you won’t be needing this and can keep the Phazer instead.

Parry Shield - It drops from the bottom Cursed Chest on 4 Cells active. I didn’t used it much except for the boss, but this shield is pretty interesting. It cannot block at all and can only parry, but the parry does significant damage. In most cases with a successful parry you will kill everything when you get few stats scrolls. Hopefully it’s there for lower cell runs as well.

PATHING

Area #1 - Because of the huge acid pit below the Barnacle this for sure became #1 instead of the current #2 - no way to survive the pit with the curse on of course. Grab the scroll above the entrance to this area first and than proceed. Start putting the turret at use the moment you grab it and the rest is really straight forward.

Area #2 - Now we can drop down grab another scroll (and an Assassin’s Dagger if you prefer it) and get cursed at the end. Hopefully you will have the Parry Shield as well or even something better from the chest.

Area #3 - This is a long long way, but except the 3 stars and the Elite nothing much is going on here. At the end you will get +2 to all Skills if you decide to get cursed again.

Area #4 - I chose this instead of the current area #5, because like I explained in the Phazer description I was getting more score this way instead of taking the Sinew Slicer instead. Don’t forget the star in the Teleportation Rune room! This star is the reason why not going to #5 first is better. If you go in the other order you will have pretty long stroll across and waste it.

Area #5 - Replace the Phazer with the last piece of the puzzle - Sinew Slicer to activate your extra damage for the boss if you decided to run with the Sadist’s Stiletto, else you might not need this turret. Better pass on the enemies and get back to them when you grab the star for maximum score.

Area #6 - One easy to grab star and every enemy is kinda below it so there’s nothing much to explain here.

Boss Fight - Should be piece of cake.

At time of posting #1 in the Leaderboards (which are beta branch now) in 1 (lol) try > [Leaderboards 09.10.2018]

and #4 in the Official version of the game in around 15 tries.

GL HF and take care! :stuck_out_tongue:

8 Likes

12.10.2018 Daily Run Breakdown

My favorite Biome…

GEAR

Oiled Sword - Pretty standard moveset, but decent enough. The fact that it covers every enemy you hit with oil is really crucial for the start of this run and it won’t be a bad idea to finish the run with it if you can’t get the later drops on your active cells / gear upgrade active.

Oil Grenade - Yeah, we go full oil and nothing to take advantage of it, but don’t worry right after the 'nade there’s a Flamethrower Turret! The short cooldown can help you put enemies into stun mode, so don’t think about it only like an applying oil throwable.

Flamethrower Turret - Most of the times I don’t like it that much… it’s kinda slow and you need to be really close to it to stay active. This time though it gets the job done with all the oil we have :stuck_out_tongue:

Fire Brands - This for sure has to be your second weapon in this run. Even if you don’t use oil 1-2 tosses from mid screen will burn out most of the enemies after you pick up all the scrolls. The Flamethrower Turret has 12 seconds of cooldown so it won’t be available all the time and this will be your damage replacement.

Infantry Bow - I doubt it will drop on anything less than 4 cells, but there might be something even better in comparison. This though, this was for sure my weapon of choice to finish the run.

Extra Options

Wrenching Whip - Another good main weapon - still uncertain if it will drop on lower cells, but I could have done my runs with it and got the same score - no problems.

Knife Dance - If you don’t want to go so much fire / oil synergy this run - the king of bleeding gear is just sitting there. It’s a worthy try if you ask me.

End Gear - if you are wondering...

PATHING

Area #1 - Nothing spectacular, just picking up the 2 extra pieces of gear right of the bat. Because there aren’t enough enemies or actually anything else… you might skip everything, because you won’t be even able to get speed buff going from this area. I decided to kill the Slashers and the Shockers for some extra points.

Area #2 - This is a long way and it includes all of the Skill Scrolls + Cursed Chest, as well as the Fire Brands and probably your next weapon instead of the Oiled Sword. I will say it again just in case - if you have bad options or no options at all the Oiled Sword is perfectly capable to finish the run for you and even compete with the top scores. This area includes only the first star you will come across if you follow my pathing that is, but for sure you will get the maximum damage for the rest of the run from here.

Area #3 - I decided to go to this area, because of +2 brutality amulet from the Elite. If you don’t get extra damage from it … than 4, 5, even 6 can be done instead at this point.

Area #4 - Doesn’t matter if you go here or #5, or #6 at this point of time, but when you do don’t forget to take maximum advantage of the stars, the gem drop and the secret.

Area #5 - Only one star, but it’s totally possible to loop around with it - killing everything.

Area #6 - Nothing spectacular here - even the star is before all of the enemies.

Boss Fight - Should be really quick if you are going Oil/Fire.

At time of posting #1 in the Leaderboards (which are beta branch now) in 2 (lol) tries > Leaderboards 12.10.2018

and #6 in the Official version of the game in around 10 tries.

GL HF and cheers!

https://www.youtube.com/watch?v=l755Pf8Vjf4

Btw if someone sees this (which I doubt) here’s a Warhammer 40k: Space Marine key: 8PNJT-RLFLQ-5D??? / ??? = the short first name of miss Pamela Anderson :smiley:. I hope it’s working. Can’t guarantee though.

8 Likes