Dead Cells - Daily Run Breakdowns

I feel you. My PC is in desperate need of an upgrade as well. Enter the Gungeon starts lagging now. ;-;

Have you thought about posting in the Dead Cells subreddit or as a Steam guide/discussion, though? I bet there will be plenty of people thankful to get some intel!

7 Likes

You just reminded me I need to go suck at enter the gungeon eventually :smiley: Joke aside - I hope you get your upgrades as soon as possible!

About posting in steam or reddit - OH NO! :smiley: I like you guys … I don’t want to help cheaters even further :smiley: … I’m not joking, but there’s legit active Cheat Engine topic in Dead Cells guides! If I go posting there I need to break my morale at first and than try to not get banned responding to idiots.

9 Likes

26.08.2018 Daily Run Breakdown

Today I can’t avoid discussing the biome /it will go in the OP as well/

BIOME

Ancient Sewers

Motion Twin managed to intertwine the atmosphere, the enemies, the rhythm of the place in such a way that you can actually smell how stinky this place is :smiley: I love it! There should be an epilepsy disclaimer for this place and soon I will explain why!
The water is replaced by toxic poison pools. Dipping your feet for less than half a second won’t hurt you, but any longer than that it will tick a small percentage of your health. The toxic pools are always largely spread and sometimes the count goes like a hundred. It’s almost always impossible to avoid at least hitting one or 2 of those mainly when you stomp from higher platforms to save few seconds in your area transitions. This isn’t that scary because the amount of chip dmg is actually tiny and the fun thing is that when it starts ticking you can avoid the whole dmg completely by swinging at enemies - replenishing your health constantly. This applies to all kinds of poison and we even have such kind of enemy present in this area (about that later). Although this will rarely be able to kill you this renders one really important modifier of your gear: +50% DMG if you are at full health almost useless! /Thankfully the gear we use didn’t had it!/

Enemies

The enemies… this is where if you have epileptic condition I can advice staying out of this :stuck_out_tongue: The flow of this area is probably the fastest of them all. Explosions - everywhere… tons of flying enemies… projectiles… charge attacks… Underground attacks and ambushes… If you haven’t mastered your dodging skills - this is the place to go to learn! It’s so frantic that I can’t complement how interesting is to play it.

Shieldbearer - common enemy as we already know even from the starting Prisoners’ Quarters biome, but ofcourse annoying to deal with. If you don’t have gear that can go through his shield the best option is to try a way to stomp on them, because they provide pretty high points for their HP pool and better not miss on this opportunity.

Purulent Zombie - Slow and really harmless for experienced players. It can ambush you hiding in the ground and it can contain drops, such as scrolls, gems, gear, food. This means it’s a must to have few goes of the daily to check every platform if there’s an ambushing hidden enemy to make sure you aren’t missing on something valuable. On it’s dead it spawns several Corpse Worms. This is where the fun begins - they follow you by teleporting, even on insane distances! They don’t provide you points, but like all spawned minions you can refresh your Speed Buff timer by killing them, so use them wisely and best before using a portal to go to another junction with the buff on.

Scorpions - Another ambushing enemy from the ground and actually … they are always hidden - you will never see one roaming around if something haven’t triggered his appearance. Like the Purulent Zombie it can drop whatever. His poison attacks are really annoying if you get hit and don’t recover your health by hitting it or whatever other enemy is close to you asap! They tick way more damage compared to the toxic pool in the area. The poison projectile attack is pretty slow and can be outrunned even, but always keep your dodge ready when you have one of those on the same platform as you are.

Disgusting Worm - The name speaks for itself, but there are some handy ways to make your life easier. First of all it can charge short distances by his biting attack which allows it to even change platforms! This might be useful if you manage to make those jump to their death or follow you to a platform where you have a cluster of enemies to take them all at same time. Upon death it releases plentiful of bomb charges that explode in particular sequence… Oh boy, isn’t that fun ?! :stuck_out_tongue: You will get stun locked if you are in the middle of those so the first best way to avoid them is of course - dodging sideways, but if your dodge is recovering and it’s not ready yet go double jumping. As you probably know shield parries repel projectiles and makes them your own and harmless to you. The bombs are no exception. Assault shield while thrusting you forward (especially combined with the dodge mechanic) can sweep all of the bombs in one go and lash them at an enemy in front of you! All boots gear can repel those bombs and yet again render them harmless for you, but this is not really reliable, because when you start kicking you will get hit by the bombs behind you and it’s a time waste.

Spiker - The name is self explanatory. It has only one attack which is insanely telegraphed by flashy effect on particular distance on the ground where you are currently at which turns into spikes after few seconds. If you are always on the move you will never get hit. Killing the spiker in time cancels the spikes spawn of course! If you are on a tiny platform and closed off by side walls your best bet is to double jump before you get hit because this thing hurts. Trying to drop down from such a situation isn’t recommended because the drop down animation takes more time and if you are passing through the platform at the time when the spikes appear - you will get hit. This enemy doesn’t have much health so I don’t consider it really annoying. Interesting thing to mention is that this is the only place when you can see those in all of the biomes!

Kamikaze - The most common flying enemy in the game! Thankfully they die by literally everything … I suppose their HP is only 1. If you don’t find the means to kill them and pass them they might initiate their self explosion and you won’t get any points nor possible drops from them! In daily runs when those guys are around I try to always have one piece of gear that can kill every single on of them even when they are not strong providers of points by giving only +2.

Buzzcutter - Another flying enemy, which is probably the most annoying. It has some of a health pool and this is what makes him annoying. It will chase you through insane distances and even after teleports. If you don’t have gear that can kill them in 1 hit I recommend just going forward until you can gather few of them in a chest room to take advantage of the Paused timer and to probably refresh your speed buff.

Most points here come from the Shieldbearers and the Spikers +6 points for each of them!

GEAR

Swift Sword - hell yeah! I love this weapon and the fact that it’s the first blueprint awarded from trying the daily while lashing out critical hits for having Speed Buff active is so fitting for a run :slight_smile: It has grenade modifier which is really helpful to stun enemies and also kinda helpful vs flying enemies. Also has +25% DMG on stunned targets but we are going to talk about that a bit later. The main thing is crits while having the speed buff of course! It’s great weapon to take single targets because of it’s fast swings compared to the second weapon I decided to go for.

Wrenching Whip - yet again… probably no surprise here. It helped me crowd control the vast number of clustered enemies and also in this case it makes easy work of the flying enemies while giving you some double jump opportunities > stomps after you swing it in the air.

Wave of Denial - Low dmg of course, but the low health of monsters here makes it shine and I don’t think it has an alternatives so I didn’t replaced it with anything. It deals with all the Kamikazes without problems, just wait for them to be close enough though. I almost forgot - it pushes the explosive charges dropped from the Disgusting Worm - take use of those killing your foes.

Death Orb - That’s an interesting one … it’s powerful, but really slow spell that goes horizontaly in the direction you caste it. It makes work for everything here and allowed me to take out the first elite + going 3 hits with the wrenching whip. Cast it before clustered enemies and go to another platform to deal with their friends! Unfortunately I couldn’t keep it till the end of the run for the boss, but probably there’s some time to go back and grab it right before the last fight.

Toxic Cloud - replaced the Death Orb. It kills slowly but it’s great crowd control utility especially when everything is low health. The fact that it was doing lightning dmg around when activated helped a lot for killing all the flying enemies by just activating it and running around so I got a lot of score by doing so.

Cudgel - amazing shield and it’s probably the best way to kill the boss. It works wonders to him. It stuns a parried enemy for few seconds and it takes only 2 to 3 of those to finish the run. Remember I mentioned the +25 % DMG towards stunned target in the swift sword description? This is the end game. Shamefully it’s not really usable fore the boss fight.

PATHING

8 Stars… 2 CURSED chest… oh boy that’s fun! This isn’t a joke :smiley: I probably died 10 times from the curses because how dense this is! BTW I’m pretty confident it’s possible to kill everything in this run and that’s why I’m so close to the top of the leaderboard.

Area 1 is yet again self explanatory and you get almost all the gear you need from it - pretty lucky! The teleporter below the starter area is really inconvenient, but I managed to make the best out of it by going back there and dropping straight down to the platform above the teleporter number 2. You only need to hang from the ledge to activate it - no need to go to the same level and than climb back up and take your prize from the elite!
Approaching area 3 can be really fun because of the Death Orb. Grabbing the scroll by not touching anyone and rushing to the star is the way to go. while climbing back up going guns blazing you might initiate the death orb before dropping to the next pit. It will wreck a lot of enemies while you are down there! Just clear everything alternating between the Swift sword and the Wrenching Whip depending of how many enemies you have in front of you. The gem is a drop by a flying enemy … welp, the second one later on as well - don’t forget to grab those. Area 4 is pretty dense but the only rule is to go for the star right away without touching an enemy.
(!!!) I decided to open up the boss teleporter before going to area 5 (!!!) and I will explain why I did it later… it’s not only because of the skill scroll.
In area 5 you have to consider there’s a star at the end and lonesome climbing above it … it’s best to at the middle of the room to stop killing enemies - grab the star by passing through what’s left and than finish it for the extra +5 pts for each kill before going up. I decided the upper cursed chest is better option because I was able to reach the star there while still having my own active. Area 7 containing of course exact number of monsters to lift your previous curse so it’s pretty straight forward. The only thing to notice though is that the star is kinda up there and I feel there’s some time to grab it and go bit back to kill what you passed by through.
Area 8 looks pretty vast but it works wonders for lifting the second Curse + another gem drop and 2 stars + a secret close by. The secret is accessible only from the right side unfortunately. You will double up the stars for sure so kill every enemy before you reach the second elite!

The boss fight takes a lot longer than on previous runs because we don’t have hard hitting gear, but a crowd killers instead. If you don’t have time to go back for the Death Orb you left for the Toxic Cloud I can only suggest using the Cudgel which drops from the last elite and this is why I did the pathing in the order you see! It shortened the fight and rendered the boss inactive like it always does :stuck_out_tongue:

At time of posting #6 in the scoreboard in 14 tries > Leaderboards 26th of August 2018

Couldn't resist at all...

As always GL HF! 3 Hours remaining!

I know I went a bit overboard this time, but the biome info might be useful for the main game as well

10 Likes

You forgot to sign your name on the map… :slight_smile: We all know it’s you though… Great daily run, as usual.

You are always #1 in my book. :slight_smile:

8 Likes

Update to the main post and explanation of the current daily run, including information for the Ancient Sewers BIOME! It’s helpful input about normal runs as well

It’s not strange I’m still at number six, because I almost killed everything in the run, so they don’t have a lot of extra score to grab compared to me. The faster and easier biomes is where even 0 cell daily runs can get you in the top 50s.

See you tomorrow guys and I will try to shorten things up, also don’t forget you can ask for unupgraded 0 cells active runs and when I have the time I will for sure help you out! Cheers!

8 Likes

27.08.2018 Daily Breakdown, Ruin.


Today’s run is a helping and a half of cold serve BS.

Biome - Lothric Castle. Not much to say really, one of the more straight forward areas filled with knights.

Enemies - Step right up good folk, do we have knights for you!? We got knights with swords, we got knights with spears, we got knights of the round table, knights of night, night of knights, knights with axes and hooks in sequined vests impersonating Clark Gable.

Gear

Lol you thought?
Cursed Sword - Good damage, mainly to you. One hit and you’re dead, have fun!
Valmont’s whip - Good for a tickle fight, if only all your enemies weren’t wearing full plate armour.

Pathing

Area 1 - This is where you die. 4 tiers with spear knights and casters both of which attack through walls, ceilings and floors.
Area 2 - BS and crackers, not even good crackers. Gritty, chalky and unseasoned crackers!

Points expected about 0-15.

8 Likes

My work is done for the day it seems :smiley: It’s pretty much on point!

7 Likes

27.08.2018 Daily Run Breakdown

I will try to keep short for today, because you already have a pretty on point input of how bad it really is :smiley: Somehow I’m at #3 spot for few hours though - the highest I’ve reached!

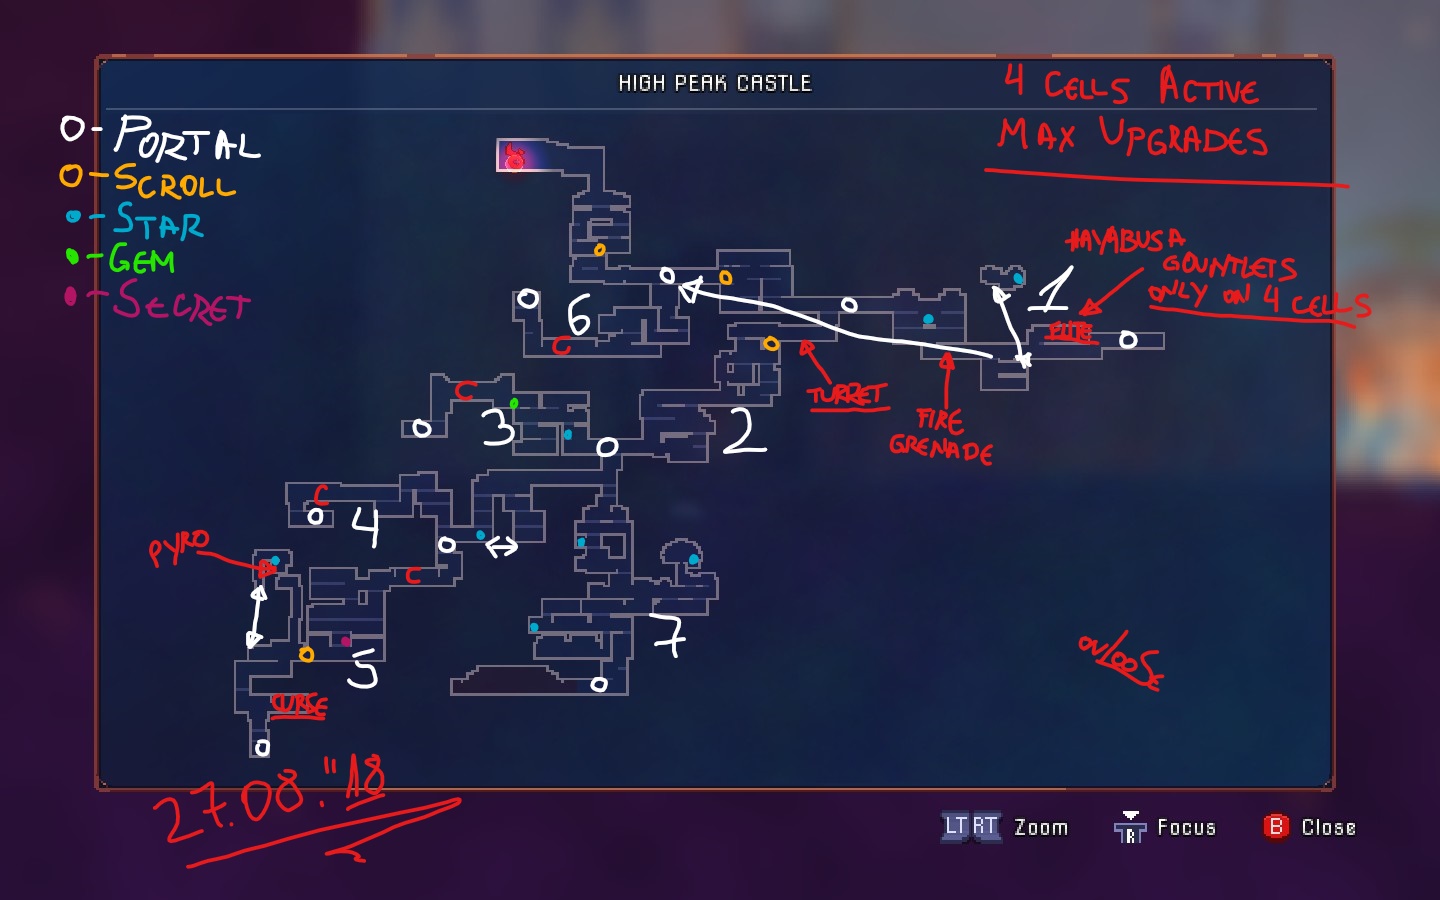
Thanks to @Fraggles (don’t you dare hide your breakdown!) I gave the starting default Rusty Sword some attempts after previously I deemed it somehow worse than the Valmont’s Whip which was huge mistake. At firs of course I managed to die 30-40 times with the Cursed Sword in the span of 10 minutes :smiley:

You already have some insight about the Biome and I can’t agree more with Fraggles so I won’t describe it this time :slight_smile:

GEAR

Rusty Sword - it’s really bad for sure, but can help initiating the speed boost until we grab better weapon. I try to kill only enough enemies with it to get speed and than maintain it in the first long section horizontally to the right.

Hayabusa Gountlets - unfortunately drop only on 4 Cells active and they made the run pretty easy for me by lashing out incredible damage - everything dies from like 1 hit. Don’t worry though … even without those you will be able to completely the run for the sake of it, because of the following 2 items:

Double Crossb-o-matic - Pretty close to the start and probably it’s better on ZERO Cells, because Fraggles said it has “Spreads burning oil” modifier. It’s thrown and forget most of the times - it can lash out insane amount of dmg while you are close to it to keep it operational.

Fire Grenade - Yet again - throw and forget and on ZERO cells you will get pretty good synergy with the turret, but I will advice to use them separately before you can grab a decent main weapon. You don’t want to be on 2 cooldowns only relying on the Rusty Sword.

Pyrotechnics - Probably the most valuable thing for ZERO cell attempts, but being so deep in the dungeon is what makes this run harder than usually. I almost didn’t had to use it on 4 Cells, but proved useful to deal with enemies on the far side of the screen instead of running to them.

EDIT : Important one for ZERO cell players - There’s a Balanced Blade between the teleporter for the Pyrotechincs and the cursed chest, but probably you won’t need it after grabbing Pyro.
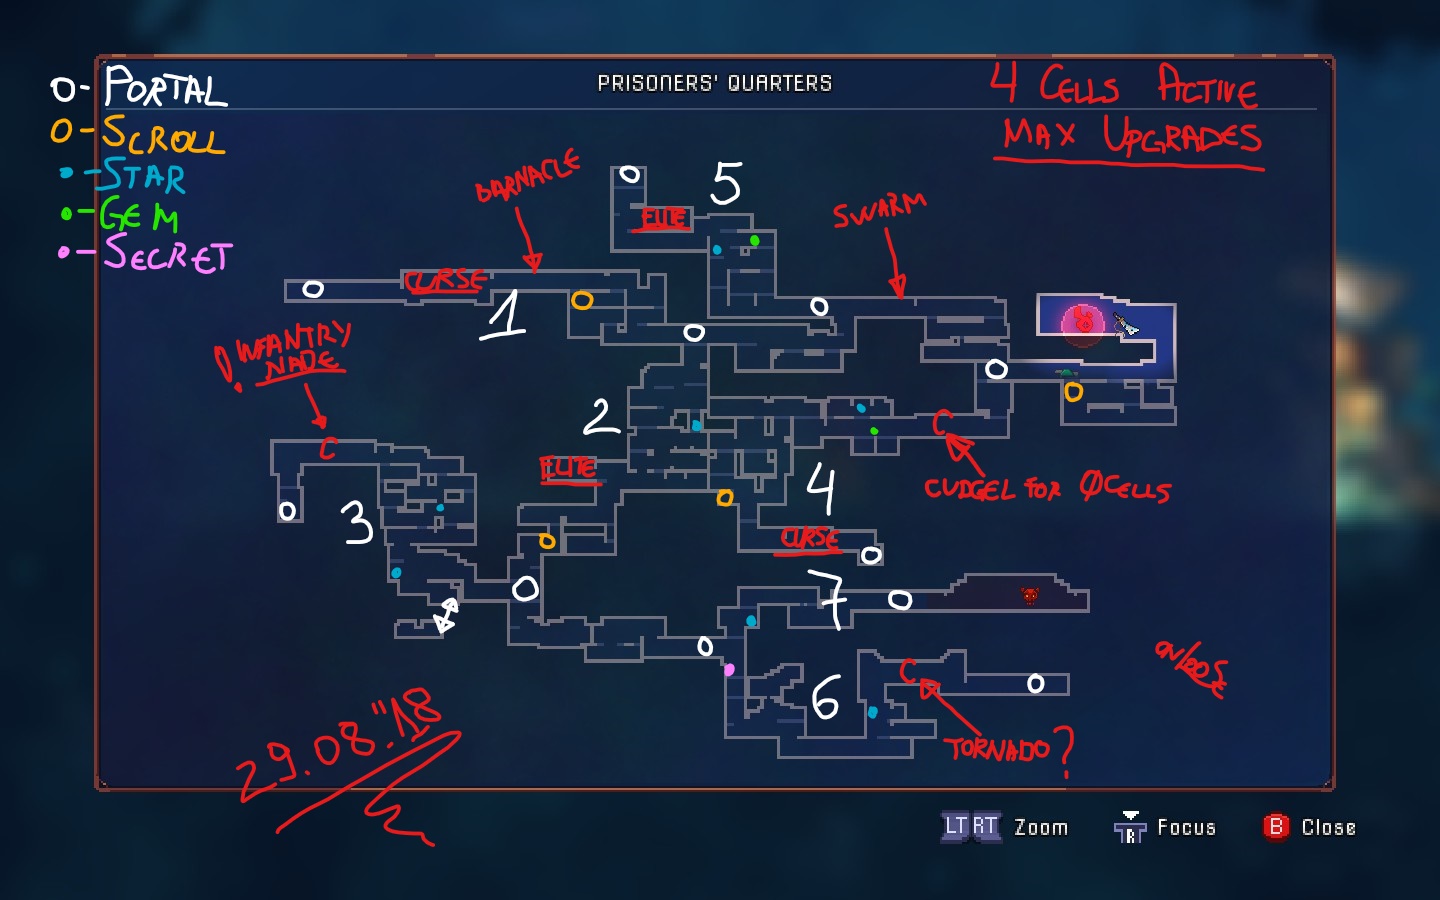
PATHING

Area #1 - I marked it on the map right to the elite, because I was mainly sprinting to him for the Hayabusa Gountlets drop. I killed few enemies at the start and than just maintained my speed boost by stomping on the Inquisitors. I take the turret before the second teleporter (to make easy work on the Elite) and head back up skipping the star and grabbing the fire nade. After killing the elite I had to loop back killing everything that’s left by taking advantage of the 2 stars. This is huge time loss, so every dodge master will go with the Cursed Sword instead, but so far there are no such masters with better score than mine.

Area #2 - nothing spectacular here so kill whatever you deem worthy, but it’s marked because after it you can go either for 3 or 4. I had better timing with the current order, but for some reason I think getting the Cursed chest + the scroll before it might speed things up - it’s 2 points of stats increase after all!

Area #3 - Pretty good place for making tons of score, because the star is at it’s entrance and this allows for taking advantage of it’s full potential.

Area #4 - You can use the star at the right of the teleporter in 3 ways - Either kill everything around it or kill everything before it and when you grab it go towards the chest. I can’t recommend the 3rd way but it’s exactly what you guessed - go to area #5 with it.

Area #5 - Here you will be able to get to the only viable weapon if you are at ZERO cells, but requires having the Teleportation Rune. Get the secret for easy +20 points too. I leave all the monsters on the platform below the secret untouched - that way I can take full advantage of the Star in the Pyrotechnics room on my way back.

Area #6 - The perfect Curse clearer from the chest from #5

Area #7 - Tons of enemies, but at this point you will have decent gear to clear all of them while making use of the 3 stars.

Boss Fight - You won’t have issues with the Pyrotechnics here, but I kill the boss for like 3-4 seconds, because the Hayabusa Gountlets have +100% DMG to a burning target. He swings once and he is dead.

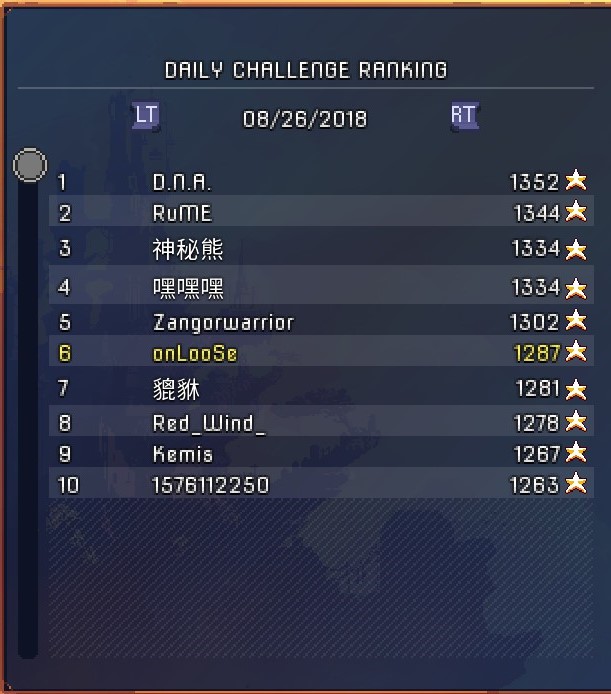
At time of posting #3 in the scoreboard in 51 tries > Leaderboards 27th of August 20181

Hopefully I will be able to keep this rank with the 5 hours remaining.

GL HF and see you tomorrow! :stuck_out_tongue:

8 Likes

This is awesome…Keep it up!:+1:t2::sunglasses::heart_eyes::star_struck:

7 Likes

You are #1 in the non-cheating category… :slight_smile: Congrats!

8 Likes

is anyone actually doing these or are we all here just to cheer on onLooSe?

7 Likes

@Fraggles for sure is getting the hang of those and I doubt without his help I would have gotten this far.

The idea of this and why I’m doing it is when some of you guys get interested and involved we can exchange information. When you have limited time testing new Routs / pathing and Gear combinations can be tedious. When I give you a proper grasp of what’s going on you can improve on it and pitch in some info back so we can be chronies in top of the leaderboards together.

Don’t forget you can get 3 blueprints by doing the daily runs (at day 1,5 and 10) even if you are new player… all items on my maps (except drops) are still there but they will have different to even no modifiers. Having the map should help just grabbing the scrolls and the Gear you need to finish it without any issues and claim your prizes.

7 Likes

28.08.2018 Daily Run Breakdown

This time around we do have Golems at the Slumbering Sanctuary version, but thankfully we also have decent starter weapon to deal with them - the Torch. Don’t forget if you go unnoticed you can completely avoid dealing with them until you get the turrets - Barnacle and the Heavy Turret!
It’s not really interesting daily run so I won’t go into much details.

GEAR

Torch - Mostly hit and forget, especially after picking few scrolls to increase your damage. I rolled with it from the start until the end!

Magnetic Grenade - Nothing spectacular to say about it … it helps to cluster some enemies like 2 or 3 times before you get to the turrets which are one after another.

Barnacle - Really good turret because shoots vertically which allows it to cover platforms above and bellow you!

Heavy Turret - Shoots slow but it’s a heavy hitter. Unfortunately for my runs it didn’t had “shot pierce the first target” modifier, but I couldn’t part with it because of the absurd horizontal range it has.

Impaler - Might help you… might not, but it’s there so it’s a worthy mention because of it’s reach compared to the torch. I barely used it.

PATHING

Right of the start there are 2 secrets for +20 pts each so don’t forget those. Where I market the star there’s a Root Grenade which is actually completely useless, but might help you to take the Golems initially.

Area #1 - Don’t forget the scroll with the Vine Rune here and this is the first turret place.

Area #2 - Really nothing of value if you don’t plan to use the impaler - just extra points.

Area #3 - I decided to open the boss path so early because the previous teleporter is at an really odd place, but unfortunately whatever order you chose - it will lose you time.

Area #4 - The star is really badly placed and that’s why I decided to go with it to area #5 where I can grab the other one exactly as this runs out while killing some enemies and taking advantage of the extra points.

Area #5 - I suppose on low cells the Elite will drop an amulet which probably will be + stat point so it’s worth to kill it.

Area #6 - Nothing fancy again for this except it has 2 stars and you might want to get cursed for the extra scroll :slight_smile:

Area #7 - 2 stars and a Gem drop while I was using it to break my curse off.

Boss Fight - With both of the turrets and the Torch this fight shouldn’t take you long at all.

At time of posting #4 in the scoreboard in 8 tries > Leaderboards 28th of August 2018

GL HF and see you tomorrow! :stuck_out_tongue:

5 Likes

Any golems on this map?

3 Likes

Plenty! But the torch and the turrets do amazing job with them :stuck_out_tongue:
Considering I’m still 4th in my ONLY 8 attempts … they aren’t scary at all this time!

2 Likes

29.08.2018 Daily Run Breakdown

Pretty EZ PZ little run, because oh well… Prisoners’ Quarters!

GEAR

Right before the boss there’s a Cudgel drop and I was sure it wasn’t there for 0 Cells, but I decided to do a test - it’s in a chest instead replacing another thing that’s not worth mentioning. I went without using a secondary before it and I doubt it’s that important for Prisoners’ Quarters Biome where everything dies from the breeze. It’s only useful against the boss yet again.

Torch - Mostly hit and forget, especially after picking few scrolls to increase your damage. I rolled with it from the start until the end! AGAIN!

Swarm - It’s really bad indeed … the little rascals don’t seem to have any teeth at all, but proved useful for few tosses where you decide to go to another platform while they try to kill something - SLOWLY.

Barnacle - Really good turret because shoots vertically which allows it to cover platforms above and bellow you!

Infantry Grenade - It’s not the best damage ever but for this run is great because of the low health of the enemies. The cooldown is so small you can use it constantly for extra damage.

Tornado - I haven’t tested it much, but I decided to deem it USELESS! It’s so far in the run I can’t help you a lot with most of the clusters out there.

PATHING

Important to mention is that area #2 and #4 aren’t connected light it might seem on the map - they are actually walled off with their different access junctions!

Area #1 - Decided to go there for the Barnacle turret first so it can help me fight on multiple platforms on the same time + cursed chest so you should have +3 skill scrolls from doing this.

Area #2 - Not much to talk here… get advantage of the star, the Amulet from the Elite and another Scroll.

Area #3 - I decided it’s worthy to grab the Infantry Grenade as soon as possible - it helps a lot for clearing everything.

Area #4 - Here you might grab the Cudgel for the boss fight and take advantage of another curse, a star and the last Scroll that’s out for free.

Area #5 - Extra points plus a nice tiny curse clear before the Elite.

Area #6 - Here I spent 2 runs to check how I can get the most value. The best way is to grab the start from Area #7 and drop down right away!

Area #7 - Here we will simply go with the start from area #6 while opening the chest and still having a lot of time to clear everything in 7 with it.

Boss Fight - With 2 parries, the turret and the nade it should take you like 10-15 seconds to take this one out!

At time of posting #5 in the scoreboard in 8 tries > Leaderboards 29th of August 2018

GL HF and see you tomorrow! :stuck_out_tongue:

5 Likes

30.08.2018 Daily Run Breakdown

No description today and I’m really sorry… Decided it’s Hollow Knight day (I blame @Gnuffi) :smiley: It’s really easy run though so you won’t have any issues with it at all.
One thing though… I started with the Impaler of course and it took me like 5 tries to get top 5… It’s really op In the sewers. I’m even not gonna push it with 5 more runs for number 1. We still have tomorrow.

At time of posting #4 in the scoreboard in 5 tries > Leaderboards 30th of August 2018

GL HF and see you tomorrow! :stuck_out_tongue:

8 Likes

Now it is I that you have to beat! @onLooSe @Fraggles

I defeated the Hand of the King on the new save but I forgot that I had the castlevania music mod enabled and didn’t get the achievement :sob:

@Wait
When does the daily reset? I think this was still the yesterday one…

@Nevermind
It’s a new one, but seems to be the same starting weapons, I don’t remember anymore!

7 Likes

Haha nice job Enki :stuck_out_tongue: I never modded the game so far, so had no idea you can’t get the achievements while having mods on.

The daily resets at about 00 : 00 UTC everyday

I don’t know if I will have the time to go again for it today. Hopefully I will do it, but when there are only like 3 hours left. Now you still have 7 hours + :stuck_out_tongue:

6 Likes

I shall have you all know I started a new save ereyesterday and shall, henceforth, endeavor firstly in actually unlocking the gorram dailies. :joy:

I suck so much at this game I don’t even have words, guys. My brain just thinks this is some kind of button-mashing competition and my heart still wants to use the shield even though it sucks ass :joy: :joy:

@Enki I totally admire your 474 rank, nice one, my dude. You show 'em.

BRB gone to buy black chicken.

6 Likes