Dead Cells - Daily Run Breakdowns

INTRODUCTION

DAILY RUN LEADERBOARDS

What’s this about? What’s going on? Climbing high in the daily run leaderboards, or… Try Hard… and I can’t be the only one around here. I have noticed that the interest about Dead Cells is growing in this community and why not try to help a tiny niche of it’s player base - people that want to feel the accomplishment by putting their names in the top 10 charts by legit means and at the same time doing their hobby (gaming) via the daily runs. At least that’s what is driving me. How am I gonna do that? It’s quit simple - by breaking the daily runs and explaining how I rolled and what I find in them + maps of course. Helping chronies push their limits and getting top 10 is the goal of this endeavour and surprise surprise … this will push me even further and we can improve together and learn from each other.

Recently I’ve been more “try hard”-ing the daily runs (don’t get scared, this means 1 to 2 hours a day) and I’m almost constantly in top 20-30. It takes max of 10-20 attempts to get there if you know what you are doing before the true grind - top 10, which we will discuss LATER and how optimizing the runs actually works.

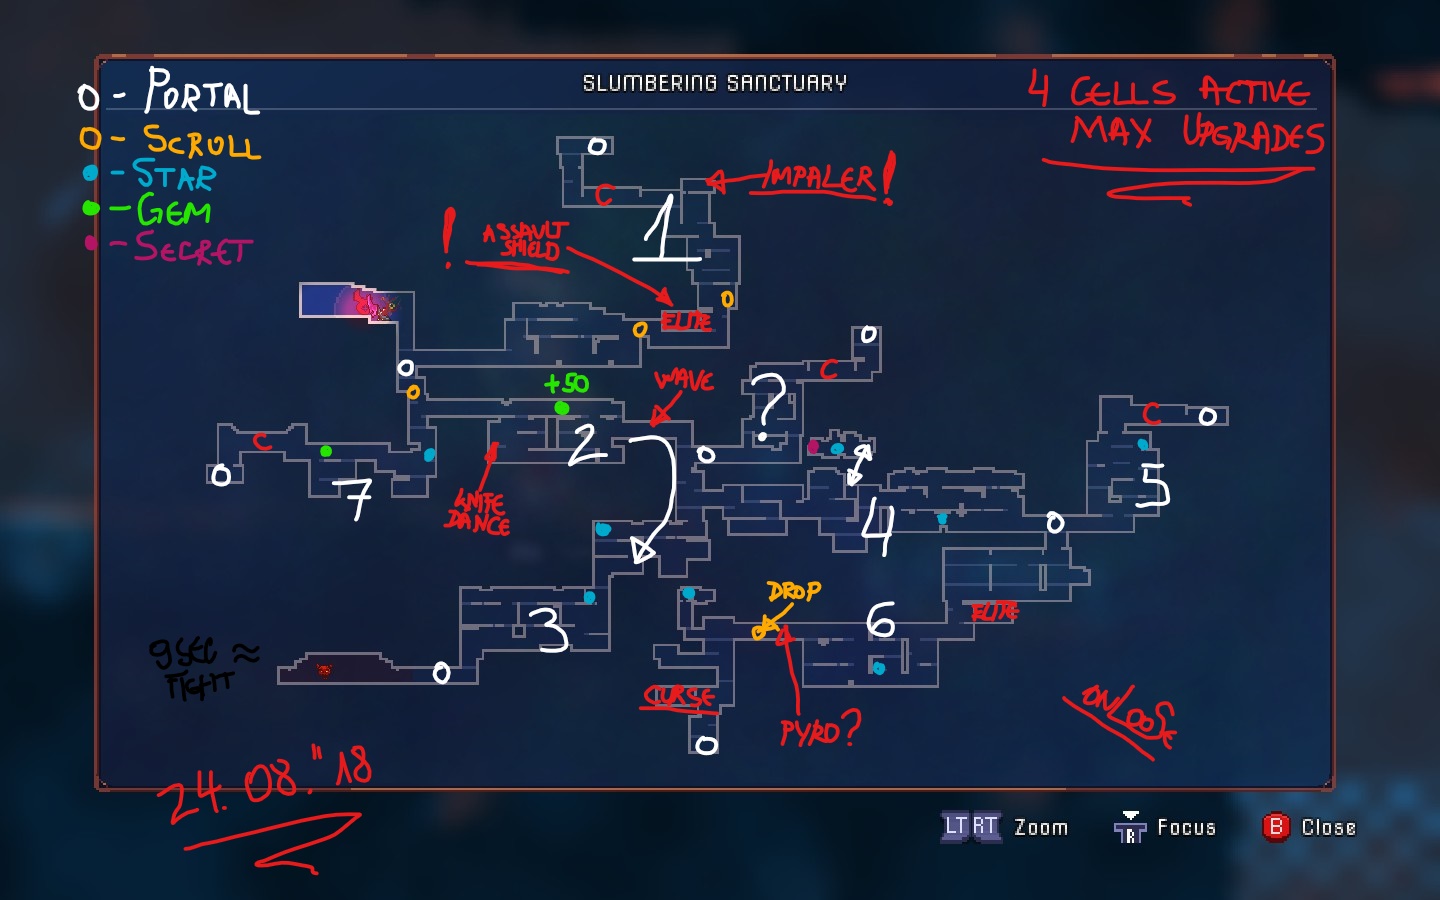
I will provide a map with breakdown of the gear I use and full explanation what I’m doing and why.

IMPORTANT INFORMATION

Your progress in the main game DOES MATTER!

CELLS ACTIVE, UPGRADE PROGRESS (at the forge) change what gear you will get and what modifier(s) are associated with it + different gem drop placements, number of monsters and even Elite types of monsters. Don’t get discouraged - it’s not impossible to get top 50 on 1 cell unupgraded in some Daily runs. You can get pretty far in the scoreboard with basic gear, but always depends on the killing potential and how good your synergies are or if they are locked behind something you can’t access.
Having 2 or 3 cells active while having your gear upgraded at max won’t help you at all. You will get lower level weapons with lower base dmg and less modifiers.

Score Comparison of 1 Cell to 4 cells / no upgrades to max upgrades - only 2-3 attempts

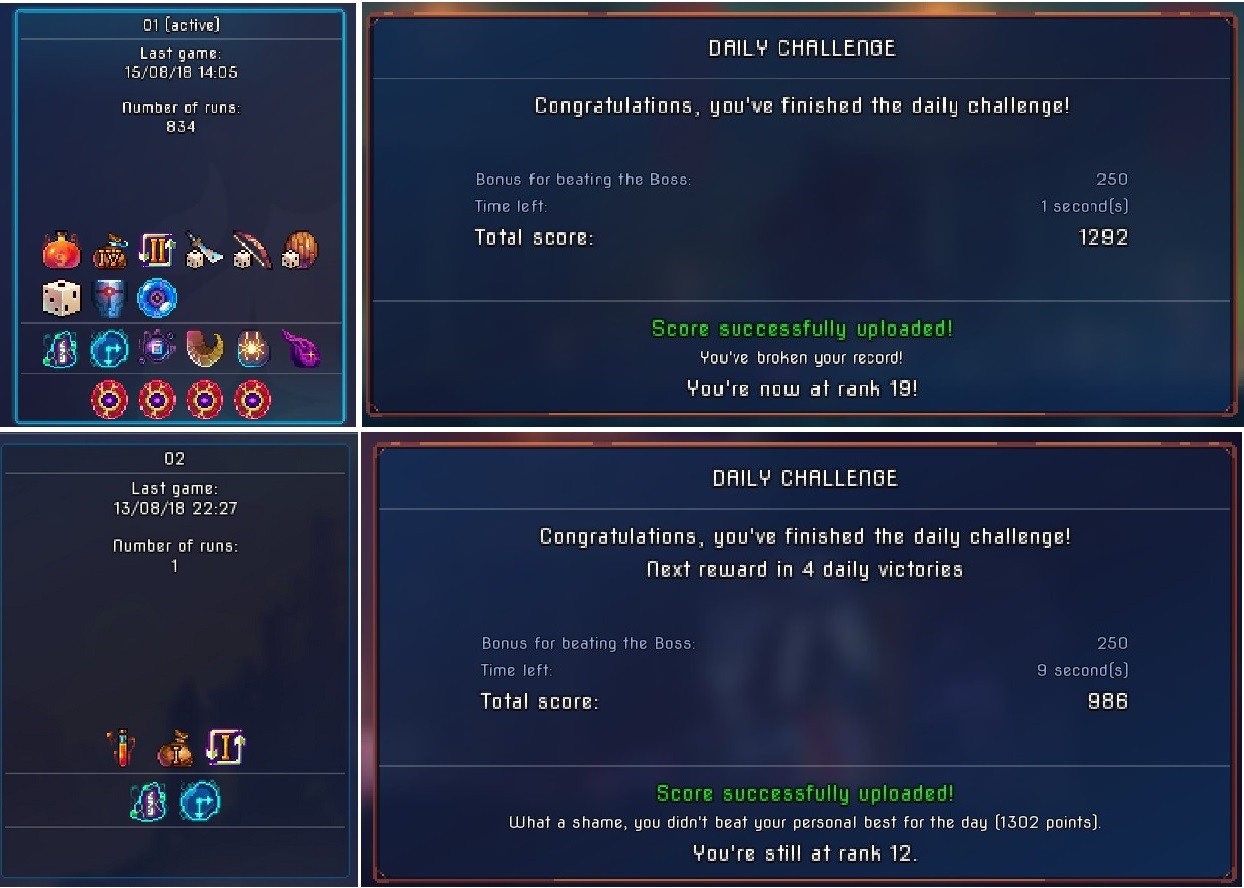
I tested with 4 cells difficulty (everything unlocked and upgraded) compared to ZERO cells (zero upgrades) on the same save file and new save slot that has only the Vine Rune and the Daily Rune unlocked and the differences are huge. @Fraggles testing supports the fact that upgrade percentage in the forge changes the weapon modifiers completely…
My idea was to post daily breakdowns mainly of 4 cell runs, but if you guys need lower I can do it! Aligning the upgrade percantages though would be impossible, but the said gear should be in it’s exact place and you can find a more suitable pathing depending of the synergies you can get depending of the modifiers.

Item Comparison depending on Cells active and Upgrade percentage

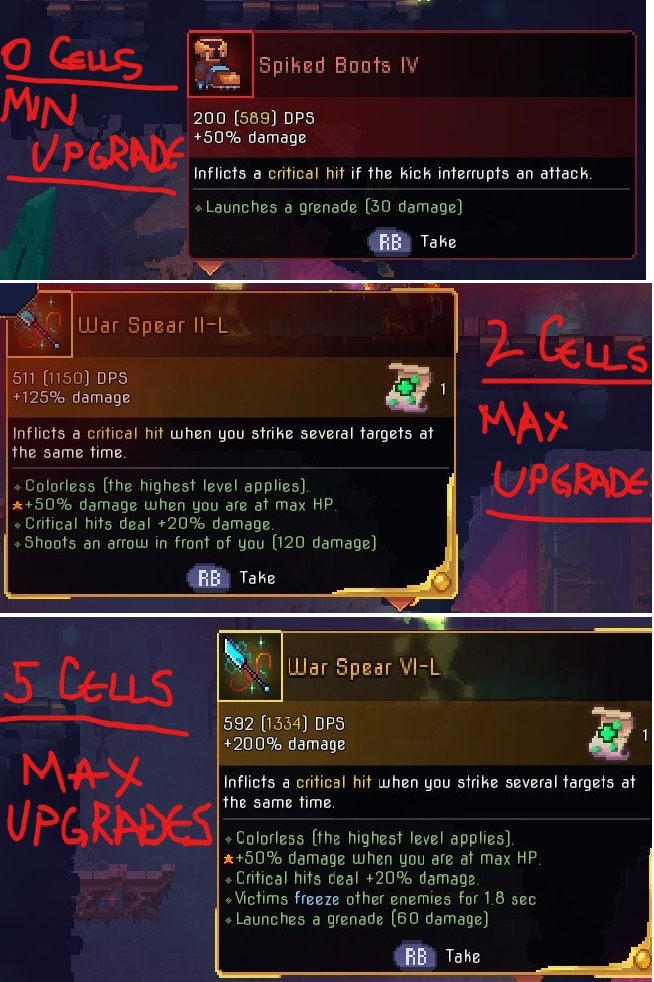
Those item drops are from killing the same Elite

Unlocks (Blueprints) don’t matter so that’s why the game incentiveses you to try the daily as soon as possible. Killing the first boss giving you this possibility can’t get any more obvious you need to try it. You get extra blueprints by participating in the daily run and it doesn’t need to be consecutive days (have to kill the “boss” though) - Switft Sword at day one, Aura of Laceration at day five and Meat Skewer at the tenth day.

CHEATERS

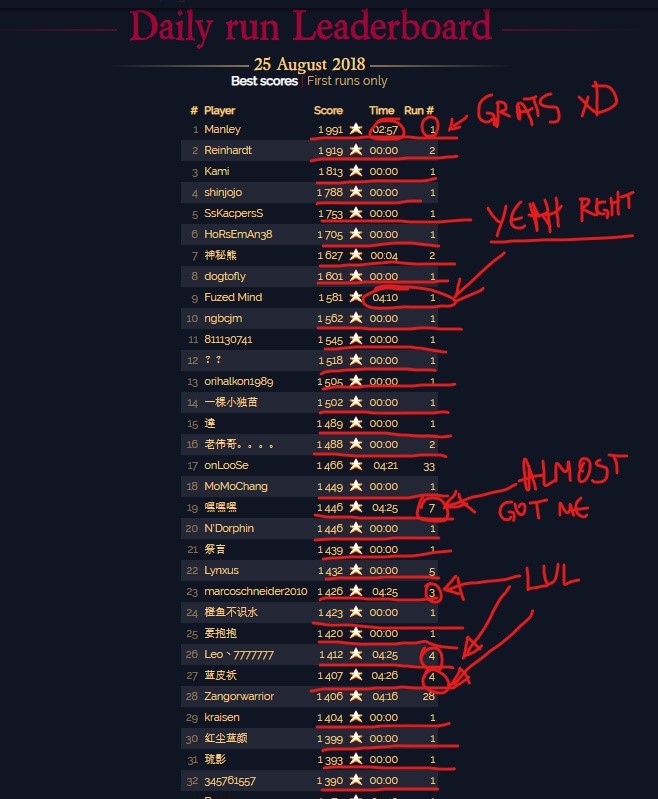
At first I thought to not address those, but recently they are walking on my nerves. Just check the daily run leaderboards for today and yesterday and you will understand why. It seems they are pausing the clock at whatever moment they want and even getting items or gems (including the +75 000 pts one) in the daily run. My mind can’t comprehend why they do it when it’s so obvious, but that’s just me… Being able to get so high in the leaderboards despite them is an achievement of it’s own. I’m just hoping Motion Twin deals with the situation as soon as possible. The official release of the game introduced even more of them… it wasn’t so bad few months ago but it is what it is. I think we can wreck them in some daily runs - my highest score was #7 after it ended and it’s because it was the prisoners’ quarters biome where it’s pretty easy to kill everything in time.
I don’t think It’s needed to post screenshots and stuff … they are pretty obvious. Use the official leaderboards to see what’s up … the in game one doesn’t matter and that’s how we try hards do things :slight_smile:

Basic Information

/it will get updated as I roll because I tend to forget about things and can’t hurt if you don’t mind to pitch in :D/

THE TIME - Don’t forget 4:30 on the clock everyday and it resets at 00:00 UTC - that’s all you get and from here we go to the most important things, like:

What gives you score


  1. Killing enemies - No surprise there. Bigger the guy or more annoying - more score as usual :slight_smile:
  2. Elites - of course you get extra points for killing those! It’s the base enemy points multiplied by 5.
  3. Opening chests +20 points.
  4. Cursed chests +30 points > +25 points when you lift up the curse and +5 points opening it. Don’t forget it always gives Skill Scroll.
  5. Stars +5 so basically they count like free kill just to walk through them. They give a 5-point bonus for each enemy killed while the blue star effect is active, which is 15 seconds! Take advantage of those. Something that the wiki doesn’t mention is that while you have the star bonus active you get +5 for every action that gives you points - opening chests and breaking secret runes in the walls.
  6. Gems - depending on the rarity
  7. Secrets +20 pts / Killing monsters with drops (not confirmed - I’m being too lazy)
  8. Boss kill +270 > it’s +250 points (at the end screen as a bonus) and +20 (for being the biggest monster in the daily). It’s always The Concierge. Killing him completes the run (obviously you will want to save him for dessert) and the boss has lowered health compared to the main game variant, no defensive abilities but starts straight with stage 3 of his attacks. Really easy and fast to take down - most of the time less than 10 secs in 4 cells active and maxed out gear upgrades from the forge. I usually tank all of his dmg even not being max health engaging him, except when I go with a good shield - that’s when I parry.
BIOMES

This is huge category to breakdown and will take some time to explain those and how they change the flow of the game because of the different monsters. /work in progress/

ANCIENT SEWERS

Motion Twin managed to intertwine the atmosphere, the enemies, the rhythm of the place in such a way that you can actually smell how stinky this place is :smiley: I love it! There should be an epilepsy disclaimer for this place and soon I will explain why!
The water is replaced by toxic poison pools. Dipping your feet for less than half a second won’t hurt you, but any longer than that it will tick a small percentage of your health. The toxic pools are always largely spread and sometimes the count goes like a hundred. It’s almost always impossible to avoid at least hitting one or 2 of those mainly when you stomp from higher platforms to save few seconds in your area transitions. This isn’t that scary because the amount of chip dmg is actually tiny and the fun thing is that when it starts ticking you can avoid the whole dmg completely by swinging at enemies - replenishing your health constantly. This applies to all kinds of poison and we even have such kind of enemy present in this area (about that later). Although this will rarely be able to kill you this renders one really important modifier of your gear: +50% DMG if you are at full health almost useless!

Enemies

The enemies… this is where if you have epileptic condition I can advice staying out of this :stuck_out_tongue: The flow of this area is probably the fastest of them all. Explosions - everywhere… tons of flying enemies… projectiles… charge attacks… Underground attacks and ambushes… If you haven’t mastered your dodging skills - this is the place to go to learn! It’s so frantic that I can’t complement how interesting is to play it.

Shieldbearer - common enemy as we already know even from the starting Prisoners’ Quarters biome, but ofcourse annoying to deal with. If you don’t have gear that can go through his shield the best option is to try a way to stomp on them, because they provide pretty high points for their HP pool and better not miss on this opportunity.

Purulent Zombie - Slow and really harmless for experienced players. It can ambush you hiding in the ground and it can contain drops, such as scrolls, gems, gear, food. This means it’s a must to have few goes of the daily to check every platform if there’s an ambushing hidden enemy to make sure you aren’t missing on something valuable. On it’s dead it spawns several Corpse Worms. This is where the fun begins - they follow you by teleporting, even on insane distances! They don’t provide you points, but like all spawned minions you can refresh your Speed Buff timer by killing them, so use them wisely and best before using a portal to go to another junction with the buff on.

Scorpions - Another ambushing enemy from the ground and actually … they are always hidden - you will never see one roaming around if something haven’t triggered his appearance. Like the Purulent Zombie it can drop whatever. His poison attacks are really annoying if you get hit and don’t recover your health by hitting it or whatever other enemy is close to you asap! They tick way more damage compared to the toxic pool in the area. The poison projectile attack is pretty slow and can be outrunned even, but always keep your dodge ready when you have one of those on the same platform as you are.

Disgusting Worm - The name speaks for itself, but there are some handy ways to make your life easier. First of all it can charge short distances by his biting attack which allows it to even change platforms! This might be useful if you manage to make those jump to their death or follow you to a platform where you have a cluster of enemies to take them all at same time. Upon death it releases plentiful of bomb charges that explode in particular sequence… Oh boy, isn’t that fun ?! :stuck_out_tongue: You will get stun locked if you are in the middle of those so the first best way to avoid them is of course - dodging sideways, but if your dodge is recovering and it’s not ready yet go double jumping. As you probably know shield parries repel projectiles and makes them your own and harmless to you. The bombs are no exception. Assault shield while thrusting you forward (especially combined with the dodge mechanic) can sweep all of the bombs in one go and lash them at an enemy in front of you! All boots gear can repel those bombs and yet again render them harmless for you, but this is not really reliable, because when you start kicking you will get hit by the bombs behind you and it’s a time waste.

Spiker - The name is self explanatory. It has only one attack which is insanely telegraphed by flashy effect on particular distance on the ground where you are currently at which turns into spikes after few seconds. If you are always on the move you will never get hit. Killing the spiker in time cancels the spikes spawn of course! If you are on a tiny platform and closed off by side walls your best bet is to double jump before you get hit because this thing hurts. Trying to drop down from such a situation isn’t recommended because the drop down animation takes more time and if you are passing through the platform at the time when the spikes appear - you will get hit. This enemy doesn’t have much health so I don’t consider it really annoying. Interesting thing to mention is that this is the only place when you can see those in all of the biomes!

Kamikaze - The most common flying enemy in the game! Thankfully they die by literally everything … I suppose their HP is only 1. If you don’t find the means to kill them and pass them they might initiate their self explosion and you won’t get any points nor possible drops from them! In daily runs when those guys are around I try to always have one piece of gear that can kill every single on of them even when they are not strong providers of points by giving only +2.

Buzzcutter - Another flying enemy, which is probably the most annoying. It has some of a health pool and this is what makes him annoying. It will chase you through insane distances and even after teleports. If you don’t have gear that can kill them in 1 hit I recommend just going forward until you can gather few of them in a chest room to take advantage of the Paused timer and to probably refresh your speed buff.

Most points here come from the Shieldbearers and the Spikers +6 points for each of them!

PRISON DEPTHS

This is level 3 biome and a lot of people are scared from it. It’s probably the hardest area you can acess in the regular game mode early on - it can be your 3rd area right after the Promenade of the Condemned (not available for Daily runs) and leads out only to the Ossuary which makes it the only possible extra area so far in the game. This is the only place that extends the regular playthrough with + 1 biome if you wanna go the slowest playthrough possible.
It’s not that scary at all, but some practice is required and what better opportunity you can get instead of playing the Daily run a bit?!

Enemies

The familiar ones from previous level Biomes are the Zombie and the Kamikaze so no point in addressing those here.

Thorny - Low HP pool, but as annoying as it can get. Their backs are protected with spikes, so hitting them from behind will damage you, but still damage them as well. The Thorny has only 2 attacks and thankfully one of them is rarely used. What they usually like to do when see you is to start up really long wind up animation that leads to “Sonic the hedgehog mode” and they are really vulnerable while they wind up and it’s easily interrupted. The second attack as rare as it is, it’s really annoying and it’s triggered when you are really close to them and they didn’t had the chance to start the first one. It’s short backwards hop which often aligns them with their back towards you so you need to roll through them to face their unprotected front side. The worst part is this one is way faster and they have short recovery time so if you aren’t fast with your attacks they will turn their back against you yet again. After some practice you will find them as harmless as Shieldbearers and they are easy provider of +5 pts. Don’t forget you can dodge through everything they do and easily jump over them (not even double jump required) because of their small size.

Slasher - Considered by most players as the most dangerous and even one of the hardest enemies in the game I beg to disagree. They have only one attack pattern which consists of 3 sword slashes and the third one launches a fire shockwave coming from the ground in half a screen distance. The only thing that works for them during this combo is that they can turn around towards you in between their hits when you dodge through them or jump over them. Safe strat is dodge through them all their attacks and they are really vulnerable after the shock wave. You can even single jump above it staying on their front (no double jump required). Dodging like that is huge time waster on a Daily run so when you get used to them start throwing a hit before each dodge (if you aren’t going with really slow weapon of course) and if the weapon has decent breach multiplier you will break their slower third attack after 2 or 3 hits and making them easy kill.
The only other thing they have going for them is a blinding fast dash towards you which is welcomed in the Daily, because they present to you opening opportunity instead of having to chase them down. Giving you +6 pts seems right.

Masker - They have no attacks at all so they are harmless on their own, but the danger comes when they are protected. Covering a large area around them with fogs that renders all enemies invisible can be really annoying, especially when they aren’t that easy to reach, because this spell works through walls of course. When you get in their range make sure you have your crowd control gear ready and your dodging skills are sharp because they are often surrounded by powerful and heavy enemies. +5 pts for those.

Hammer - Those are only placed in the Prison Depths. Now that’s really annoying enemy if you don’t have enough damage output to take them out quickly. They have only 2 attacks. First one is a ground slam so if you are underneath them you will get hit and this move is always followed by 4 bombs release around you. Because of the slow fuse you will have some time to land few hits before having to jump out of the bombs range and because they explode one after another in a random sequence dodging in any direction isn’t advised - double jump out of there if you don’t want to tank the damage. The second ability they have is spawning 4 Corpse Flies (they do reset your speed buff so take advantage of that little fact) which is even more annoying than the first one. You might think ranged weapon is the way to go against them, but if you don’t have piercing or AOE the flies will start to block your projectiles pretty soon and you might get overwhelmed by flies and bombs at the same time. Having high damage output before engaging is the best way to go if you want to kill them unscathed.

OPTIMISATION of the RUN

From my understanding I can break down this experience in four components: Speed (LOL like someone didn’t expected that); Routing; Gear; Enemy management, which are all tangled together… so intertwined that they work like the musical instruments in your favorite song. Motion Twin managed to nail down that aspect of the game perfectly - each of those things reacts according to the rest and I don’t remember any other dev managing to pull it off in such way. If you are falling behind in single one of those things nothing will work in the end.

1. SPEED
This is really complex topic. Sometimes you will be able to take out every enemy on the daily (depending on the biome), sometimes you need to try to make the best by making sacrifices. The most important thing though is the speed boost you get after killing 8 or more enemies in quick succession that lasts for 7 seconds. This buff is indicated by the double arrow pointing right above your head and increases your base speed about every movement you can make - running, dodging, climbing, etc. The best part is that killing a single enemy refreshes it’s timer, the bad part about it is that you need to find a way to maintain it and this is where the rest of the components come in place.

2. ROUTING
Probably the hardest part of the Daily. You need to take notion of every enemy; every gear (every possible synergy) and find the order that will allow you to kill everything possible as easily as it can be. This is where I have most of my problems and probably that’s what we can figure out together and push each other further.

3. GEAR
I hope you have learned from the main game already (if you are new to the daily) that there’s not bad gear - utility or weapon … everything can work, it just depends on the synergy and the situation. Really often you need to grab a weapon just for particular junction or 2 to make your life easier and this is where you can get full advantage of pathing and speed. Sometimes you grab the utilities that complement a particular weapon you love to use in the current daily run. I will explain how I put those pieces together in every daily run breakdown, depending on what I find to be the fastest combo for said day.

4. ENEMY MANAGEMENT
In the main game killing enemies left and right isn’t punished as hard as in the daily. In a hard biome you will be often forced to skip a lot of kills if they aren’t exactly on your way. Getting kills of low points enemies in a cluster on your way may grant you a lot more points than struggling with few harder enemies. The ability to maintain the speed buff to get as much as points as possible is what matters here and of course it’s easier to refresh your buff at low health monster. A lot of the times it’s possible to kill everything straight up, but you need to consider the Routing and be able to get back to a monster after using a portal to keep up your speed. Leaving one or 2 behind in particular junctions is common way of doing things if you can get benefit of doing so.
Don’t forget the game is PAUSED at chests - useful for enemy management and dragging aggravated teleporting elites there. It might be a good rest time if you decide to have a flask swing to replenish some health. Consider your speed buff though because you will lose it staying there.

FINAL ADVICE

Thanks Motion Twin for making this reference!

IMPORTANT LINKS

DAILY RUN LEADERBOARDS
WIKI about Mechanics
WIKI about Daily Runs

P.S. The whole thing is a work in progress so any advice on formatting and whatever is highly appreciated, but don’t forget I’m lazy :smiley: . Whatever you think of what must be included - feel free to suggest. I just hope there will be some interest for this.
I’m non @Gnuffi alt so constructing and editing paragraphs takes a bit of time for me :blush:

My english isn’t the best as you can tell already and sorry about that :stuck_out_tongue:

16 Likes

24.08.2018 Daily Run Breakdown

Today we have a tougher one, but thank god there are no Golems which is pretty lucky considering they only spawn in Slumbering Sanctuary biome. We have on our hands high health and annoying enemies though. The Catcher can lose you a lot of time if he manages to land a hook on you and ohh… the Caster… with his annoying teleportation skills he is literally running away with your daily points and unfortunately his health saves him from most stomp dmg even from 2 platforms above him. Fortunately the Maskers don’t move at all and are stable providers of +5 pts.

Gear

In this run we have almost all crowd killing weapons to chose from and they can net pretty good scores, but I decided to center my run around the Impaler compared to Symetrical Lance and War Spear. All of those are situated in area 1 (see the map) and no wonder this is the first place we go to after grabing the Skill Scroll below the teleporter to boost our dmg right from the start.

The Impaler - Goes through all of the enemies in front of you and does critical strikes if something is up against a wall. It has pretty good reach too. I went with it cuz of the other pieces of gear which helped me achieve the critical hits pretty often.

The Assault Shield (doesn’t drop from the Elite on 1 cell runs unfortunately) is the most valuable piece of today’s puzzle and it’s an amazing gear for the daily runs especially! This is good opportunity to talk about it’s mechanics. When you press the block button it moves you forward instantly and this allows for a lot of interesting things. You can push enemies off ledges pretty fast and gravity is most of the time a death sentence for them. This one in particular has 300% DMG modifier (max upgrades at the forge) after a parry so it’s an insta kill for everything and shortens the boss fight significantly, but that’s not all… Some of you might not know this but when you press the block/parry button and almost instantly after it the dodge button you gain insane thrust forward - more than half screen distance in a blink of an eye. This is the main reason you wanna grab this thing right at the start. If timed correctly parry + dodge combo can take out the zombies while you pass through them and also helps a lot the Impaler weapon, because you can push enemies towards the walls where you can initiate the critical hits. Don’t forget you can dodge in the air so of course you can use the Assault Shield mechanic like that too and it really helps avoiding ledge climbing on lower platforms - climbing is time waster.

Knife Dance - It’s just sitting there and it’s basicly use and forget… just move on. 4 Cells + max upgrades allowed me to bleed out even the Catchers while I was already at a different platform.

Wave of Denial - Just amazing with the Impaler and Assault Shield combo. Pushes enemies off the ledges or towards walls and if this doesn’t kill them - the crits of the Impaler will do the job. It helped me a lot for enemy management because I was able to cluster a lot of them on few occasions and make work with the piercing attacks of the main weapon.

PATHING

Going to area number 1 right of the start is self explenatory - you get your 2 weapons - spear and a shield that allows you to move with blinding speed and on top of that… 3 scrolls - a lot of dmg for the start. Area number 2 is your 2 complementary gear pieces and don’t forget the +50 pts Gem drop at 4 Cells.
From here we are set to decide where we want to go, because I couldn’t find better gear to work for me so far.
First I tried to go to area 4 instead of 3, but because of the bad positioning of the teleporter connecting those I had a straigh drop to the area before the boss and going the other way was waste of 2 to 3 seconds more. It’s always useful to have the boss teleporter as early as possible so you can feel more relaxed being able to break the run as soon as you find a teleporter and kill the boss in the last seconds remaining. Take advantage of the stars in those areas, also it’s up to you if you will break the secret before picking up the Star in the little teleportation room. If you can get more kills when you get back - get the secret first and than pick up the Star.
Area 5 doesn’t break your speed so it’s way faster to go there compared to 6, but I advice killing only a few enemies before dealing with the rest - take advantage of the Star there.
In area 6 I decided to not bother with the elite, because it’s a Catcher and I lost a lot of speed dealing with him. When I pass by there at least I can maintain my speed buff, but he has better ammulet. It’s an option to engage him and fight him in the cursed chest paused area which I haven’t tried yet.
Area 7 is perfect for breaking the curse. It contains exactly 10 enemies… Star…Gem…Chest… it’s a must go. The platform right next to the first teleporter leading to area 1 contains 2 (or3) zombies and 1 Catcher - I left those roaming free because I need to use that teleporter 2 times and If I can sustain my Speed buff… thank you game!
Area “?” - couldn’t spare time to go there and I didn’t find anything useful except the 20 points from opening the chest. Being a vertical climbing room makes it even more waste of time. I’m skiping this for now.
BOSS - After 4-5 parries he is done … if you use my gear recomendations you might force him to one of the doors if you don’t parry his jump attack and even take advantage of 3-4 crit strikes with the impaler.

THOUGHTS

It’s impossible to kill everything in this run without cheating, so I can advise keeping stable speed buff from area to area; cluster your foes and use the crowd killing weapons; don’t forget to use your gear as much as possible; go to the stars as soon as possible in every area and take maximum advantage of it.

Take notice that the last 2 scrolls are both in area 6: drop from a Zombie and a Cursed chest. I tried to take advantage of this and went there early for 2-3 attempts, but for some reason the extra dmg didn’t really helped me to get higher score. Maybe I need to try 1,2,4,6,3,5,7 order…

At time of posting #18 in the scoreboard in 17 tries > Today run
GL HF!

12 Likes

This is just impressive. Without the cheaters, you would be in 4th place right now.

Keep it up!

8 Likes

Haha, you managed to start this thread on a slumbering sanctuary day? What brilliant luck you have.

8 Likes

No Golems though which are always offputting, cuz you need either to take your time for them to turn around so they don’t see you or you need to face them… I hate going to this Biome :stuck_out_tongue:

9 Likes

25.08.2018 Daily Run Breakdown

This one is just peachy… and the Ossuary is my favorite biome even… So many things to do and so little time - it’s huge. The amount of enemies we have today; the fact that the boss is on the far end; 7 stars… If I tell you that I cried from pain, won’t be a lie! Fortunately we don’t have to deal with Lacerators this run and the toughest enemies here of course are the Slashers, no surprise there. As annoying the Shockers are they have really small HP pool so they are no problem to stomp and it takes 2 swings tops with whatever weapon you are utilizing. Spawners have insane amount of HP, but they give you +12 pts and the Slasher only +6, so they are really worth killing, but more importantly - the Shieldbearers give +6 points as well and they die like flies. Don’t skip them!
I got severe dilemma right off the bat - Torch or Wrenching Whip, but let’s just start and address this thing first:

GEAR

Wrenching Whip - Has insane reach for melee weapon and to top it off it pulls enemies towards you for the final 3rd critical strike. Interesting mechanic is that in short periods of time you may prep your critical attack (this applies for every melee weapon). For an instance you may use the whip from mid range killing 2 simple Zombies with 2 whip strikes, drop down to another platform and because this is done in quick span of time - land your prepared critical strike to whatever you hit there. This allowed me to take out Slashers really fast. At first attempts I started with the Torch and still it’s really tempting to try it again because at 4 cells and max upgrades it’s basically hit and forget deal. Everything except the Slashers and the Spawners dies in 1 hit and burns on the next second. Because it’s the Ossuary though… we have huge problems using it: Shieldbearers and Thronies. When I started with the Torch I had to use heals because I was killing myself against those guys… gotta go fast after all, so there’s no time to dance around. The whip avoids shields completely and also avoids the spikes of the Thornies! There are probably thousand enemies + in this run and because there are a lot of clusters the Whip should be the better choice and I forgot to mention it’s crowd killing weapon so it hits everything in it’s reach.

Pyrotechnics - I never bothered to use it hahah :smiley: Might have saved me some time in few situations, but who knows… You only have 2 more options - Crossbow and Ice blast - both really really slow, so they are no go! From the first elite out there you get amulet with inflammable oil, but even using this combo against the boss it still was slower compared to the Whip.

Knife Dance - Yet again like yesterday… we get this right from the start. I can’t consider replacing it at all with whatever in this run. It’s the easiest way to kill everything even the Spawners! Just dodge between their little minions and when you get a clear shot for their body mass… pull the trigger and you can go do whatever while they die in horror :slight_smile:

Phaser - It’s shame it has +100% dmg to a burning target, because I’m not using the torch but it saves you a lot of time and make sure you take full advantage of the 3 seconds cooldown. It teleports you right behind the enemy that’s closest to you so if you teleport behind a thorny you will get damaged even using the Whip and get wrecked if you use the Torch and don’t heal yourself.

Magnetic Grenade - At first I completely dismissed it but after some runs it proved to be better than the Phaser, so it’s a good idea to switch to it when you get to the cursed chest. Doesn’t have any valuable synergies which is shame but it kills all small enemies in 3-4 seconds while you are dealing with the bigger ones. Use it often, because the Ossuary is really dense and there are a lot of opportunities to kill enemies from higher and lower platforms in one throw.

PATHING

Today it’s far more linear compared to what we had previously, but still some choices have to be made. The first teleporter is pretty far from the starting point so there’s no need to discuss area number 1 at all! The question is after grabbing the star where to go to and take full advantage of it. Area 2 + grabbing the phaser is by far the best choice from my runs, also the skill scroll is faster to get there compared to the one above the Portal. It’s kinda unlucky but there’s not a single enemy on the portal platform so it’s certain the speed buff is lost when you get back to it to go to area 3. I guess there’s no difference to go to 4 instead of 3 at first by only grabbing the scroll and killing the first elite, but you will need to climb again to 3 eventually and the star there gives you a lot of extra points +20 from opening the chest. Area 5 is self explanatory - 2 scrolls and excuse me … 4 fucking stars!!! (I count the one from area 4 too because you can kill 3-4 enemies with it there and head to area 5) This is where you will get the most of the score today and those stars are placed in such order you will be able to even stack 2 of them for few seconds for whooping +10 extra points a kill. Don’t worry, you will get your curse cleared before you even get to the teleporter above area 6. The number of enemies is just exactly perfect and the verticality allows for pretty nice Magnetic Granade throw you just got from the cursed chest.
The star in area 6 is really well placed and it allows for a perfect toss of the Magnetic nade to the right of it. This will allow you to suck almost all of the enemies from the platform above and the water below … kill everything here for maximum points.
The path to the next teleporter has nothing to it so just use your nade and Knife Dance and don’t spend any time in there. The Gem at area 7 drops from a zombie and as far as I remember it’s only +20 but that’s enough a reason to go there. 25+ attempts I couldn’t reach the boss in time because of the annoying Shockers in the last part. They will break your climbing if you don’t use the magnetic nade properly and climb from the far left side. Toss it on the platform just below the Star so when you grab it - it will get few kills while the bonus just activated.

THOUGHTS

The Flame Turret I deem too slow for anything…
The lack of useful secondary is not that problematic, but I think I could have used the Pyrotechnics a bit more for some situations. This run is really hard because of the sheer number of enemies and the incredible amount of management you have to do. The Phaser, magnetic grenade and knife dance do wonders here so you need to keep your left eye on the hud for the cooldown timers and the right one for killing enemies :smiley:

I don’t know if I have the strength left to improve my score further, but whatever…

At time of posting #17 in the scoreboard in 33 tries > Leaderboards

JOKE OF THE DAY


Seriously?! Geee… thanks I guess…

11 Likes

That 嘿嘿嘿 fellow is pretty high every day with varying number of tries and times, some days a very few number of tries though. Not sure if he’s a cheater real dedicated to mask himself or if he’s legitimately really damn good.

Level 1 steam account, a single badge and 3 friends all of whom are similarly barren profiles. Wondering what the hell the point is of setting up dummy steam accounts to cheat yourself into a daily leaderboard of a smallish indie game.

7 Likes

His nick name makes him far too noticeable so unintentionally I keep an eye on him for months … I won’t say it right away, but guess what I think about him? :smiley:

It’s not small at all, but damn… You know my take on this … My mind can’t grasp what’s going on in their heads to cheat on the only MP aspect of totally SP game…

I thought I don’t want to be naming and shaming at first, but then I figured it out … they name and shame themselves

8 Likes

Congrats on all your progress so far! Seriously. And woah almost 300 hours on Dead Cells?! I got play it more, man. :joy:

I could use with some tips since I suck at it, so your posts are really insightful.

Btw, added you on steam to check on your progress, if that’s cool for you. :butterfly:

8 Likes

i dont get the leaderboard
i get that the 00:00 time people are all fake but the other ones are a bit shady in my opinion
like you are the only legit player of this game

you have 300 hours that means you know what to do you have the experiance
the first guy has less than 60 hours and did it in one try?
number nine has 32 hours
half the profiles are empty

are they just this good already?

i really dont know, i mainly play csgo and there i dont meet many players who are bellow 1000 and i only have like an average rank

9 Likes

Thanks a lot for the interest! I kinda addressed the cheaters in small paragraph hidden behind the " Important Information" in the main post, but they are basically able to pause the clock whenever they want and kill everything without having to worry about the 4 :30 timer. Yesterday one even cheated in Philosopher’s stone to get + 75 000 points … And I’m not joking when I say you can’t get 1400+ score with less than 10 runs in this daily… You can’t explore it properly in so few attempts. :slight_smile:
There are so many enemies and you need to kill each one of them in your first attempts to check if they have drops … this is actually the main reason I’m doing the map non the less if it can help you guys … I kinda need it to get the scores I’m going for.

9 Likes

Damn, you’re making this a science! You should take this to Steam or even Twitch if you can record! I haven’t played Dead Cells in a long time, but I know how addictive the leaderboards can be in rogue-likes and I always wanted someone in the higher percentiles showing how they do it to improve my game. Unfortunately you won’t find that audience in our little forum and I don’t want to see that effort go to waste!

9 Likes

Thank you very much but unfortunately I can’t record ATM… I haven’t owned a PC in like 10 + years and my laptops aren’t capable of doing it ;( It’s probably for the best because I try hard in a lot of games… If I had decent capable recording PC I probably would have went broke pretty fast :smiley: I top some FPS rogues too and when I’m in the mood I need to remember how to top the spelunky daily challenges again :smiley:

Don’t worry that my efforts are going to waste… The only thing that takes time for me is putting the text in. I’m making the maps regardless for the daily runs because I can think about better routes and I tend to forget stuff :smiley: I have high hopes someone will get hooked … eventually … and Motion Twin will deal with the cheater issues :slight_smile:

8 Likes

I feel you. My PC is in desperate need of an upgrade as well. Enter the Gungeon starts lagging now. ;-;

Have you thought about posting in the Dead Cells subreddit or as a Steam guide/discussion, though? I bet there will be plenty of people thankful to get some intel!

7 Likes

You just reminded me I need to go suck at enter the gungeon eventually :smiley: Joke aside - I hope you get your upgrades as soon as possible!

About posting in steam or reddit - OH NO! :smiley: I like you guys … I don’t want to help cheaters even further :smiley: … I’m not joking, but there’s legit active Cheat Engine topic in Dead Cells guides! If I go posting there I need to break my morale at first and than try to not get banned responding to idiots.

9 Likes

26.08.2018 Daily Run Breakdown

Today I can’t avoid discussing the biome /it will go in the OP as well/

BIOME

Ancient Sewers

Motion Twin managed to intertwine the atmosphere, the enemies, the rhythm of the place in such a way that you can actually smell how stinky this place is :smiley: I love it! There should be an epilepsy disclaimer for this place and soon I will explain why!
The water is replaced by toxic poison pools. Dipping your feet for less than half a second won’t hurt you, but any longer than that it will tick a small percentage of your health. The toxic pools are always largely spread and sometimes the count goes like a hundred. It’s almost always impossible to avoid at least hitting one or 2 of those mainly when you stomp from higher platforms to save few seconds in your area transitions. This isn’t that scary because the amount of chip dmg is actually tiny and the fun thing is that when it starts ticking you can avoid the whole dmg completely by swinging at enemies - replenishing your health constantly. This applies to all kinds of poison and we even have such kind of enemy present in this area (about that later). Although this will rarely be able to kill you this renders one really important modifier of your gear: +50% DMG if you are at full health almost useless! /Thankfully the gear we use didn’t had it!/

Enemies

The enemies… this is where if you have epileptic condition I can advice staying out of this :stuck_out_tongue: The flow of this area is probably the fastest of them all. Explosions - everywhere… tons of flying enemies… projectiles… charge attacks… Underground attacks and ambushes… If you haven’t mastered your dodging skills - this is the place to go to learn! It’s so frantic that I can’t complement how interesting is to play it.

Shieldbearer - common enemy as we already know even from the starting Prisoners’ Quarters biome, but ofcourse annoying to deal with. If you don’t have gear that can go through his shield the best option is to try a way to stomp on them, because they provide pretty high points for their HP pool and better not miss on this opportunity.

Purulent Zombie - Slow and really harmless for experienced players. It can ambush you hiding in the ground and it can contain drops, such as scrolls, gems, gear, food. This means it’s a must to have few goes of the daily to check every platform if there’s an ambushing hidden enemy to make sure you aren’t missing on something valuable. On it’s dead it spawns several Corpse Worms. This is where the fun begins - they follow you by teleporting, even on insane distances! They don’t provide you points, but like all spawned minions you can refresh your Speed Buff timer by killing them, so use them wisely and best before using a portal to go to another junction with the buff on.

Scorpions - Another ambushing enemy from the ground and actually … they are always hidden - you will never see one roaming around if something haven’t triggered his appearance. Like the Purulent Zombie it can drop whatever. His poison attacks are really annoying if you get hit and don’t recover your health by hitting it or whatever other enemy is close to you asap! They tick way more damage compared to the toxic pool in the area. The poison projectile attack is pretty slow and can be outrunned even, but always keep your dodge ready when you have one of those on the same platform as you are.

Disgusting Worm - The name speaks for itself, but there are some handy ways to make your life easier. First of all it can charge short distances by his biting attack which allows it to even change platforms! This might be useful if you manage to make those jump to their death or follow you to a platform where you have a cluster of enemies to take them all at same time. Upon death it releases plentiful of bomb charges that explode in particular sequence… Oh boy, isn’t that fun ?! :stuck_out_tongue: You will get stun locked if you are in the middle of those so the first best way to avoid them is of course - dodging sideways, but if your dodge is recovering and it’s not ready yet go double jumping. As you probably know shield parries repel projectiles and makes them your own and harmless to you. The bombs are no exception. Assault shield while thrusting you forward (especially combined with the dodge mechanic) can sweep all of the bombs in one go and lash them at an enemy in front of you! All boots gear can repel those bombs and yet again render them harmless for you, but this is not really reliable, because when you start kicking you will get hit by the bombs behind you and it’s a time waste.

Spiker - The name is self explanatory. It has only one attack which is insanely telegraphed by flashy effect on particular distance on the ground where you are currently at which turns into spikes after few seconds. If you are always on the move you will never get hit. Killing the spiker in time cancels the spikes spawn of course! If you are on a tiny platform and closed off by side walls your best bet is to double jump before you get hit because this thing hurts. Trying to drop down from such a situation isn’t recommended because the drop down animation takes more time and if you are passing through the platform at the time when the spikes appear - you will get hit. This enemy doesn’t have much health so I don’t consider it really annoying. Interesting thing to mention is that this is the only place when you can see those in all of the biomes!

Kamikaze - The most common flying enemy in the game! Thankfully they die by literally everything … I suppose their HP is only 1. If you don’t find the means to kill them and pass them they might initiate their self explosion and you won’t get any points nor possible drops from them! In daily runs when those guys are around I try to always have one piece of gear that can kill every single on of them even when they are not strong providers of points by giving only +2.

Buzzcutter - Another flying enemy, which is probably the most annoying. It has some of a health pool and this is what makes him annoying. It will chase you through insane distances and even after teleports. If you don’t have gear that can kill them in 1 hit I recommend just going forward until you can gather few of them in a chest room to take advantage of the Paused timer and to probably refresh your speed buff.

Most points here come from the Shieldbearers and the Spikers +6 points for each of them!

GEAR

Swift Sword - hell yeah! I love this weapon and the fact that it’s the first blueprint awarded from trying the daily while lashing out critical hits for having Speed Buff active is so fitting for a run :slight_smile: It has grenade modifier which is really helpful to stun enemies and also kinda helpful vs flying enemies. Also has +25% DMG on stunned targets but we are going to talk about that a bit later. The main thing is crits while having the speed buff of course! It’s great weapon to take single targets because of it’s fast swings compared to the second weapon I decided to go for.

Wrenching Whip - yet again… probably no surprise here. It helped me crowd control the vast number of clustered enemies and also in this case it makes easy work of the flying enemies while giving you some double jump opportunities > stomps after you swing it in the air.

Wave of Denial - Low dmg of course, but the low health of monsters here makes it shine and I don’t think it has an alternatives so I didn’t replaced it with anything. It deals with all the Kamikazes without problems, just wait for them to be close enough though. I almost forgot - it pushes the explosive charges dropped from the Disgusting Worm - take use of those killing your foes.

Death Orb - That’s an interesting one … it’s powerful, but really slow spell that goes horizontaly in the direction you caste it. It makes work for everything here and allowed me to take out the first elite + going 3 hits with the wrenching whip. Cast it before clustered enemies and go to another platform to deal with their friends! Unfortunately I couldn’t keep it till the end of the run for the boss, but probably there’s some time to go back and grab it right before the last fight.

Toxic Cloud - replaced the Death Orb. It kills slowly but it’s great crowd control utility especially when everything is low health. The fact that it was doing lightning dmg around when activated helped a lot for killing all the flying enemies by just activating it and running around so I got a lot of score by doing so.

Cudgel - amazing shield and it’s probably the best way to kill the boss. It works wonders to him. It stuns a parried enemy for few seconds and it takes only 2 to 3 of those to finish the run. Remember I mentioned the +25 % DMG towards stunned target in the swift sword description? This is the end game. Shamefully it’s not really usable fore the boss fight.

PATHING

8 Stars… 2 CURSED chest… oh boy that’s fun! This isn’t a joke :smiley: I probably died 10 times from the curses because how dense this is! BTW I’m pretty confident it’s possible to kill everything in this run and that’s why I’m so close to the top of the leaderboard.

Area 1 is yet again self explanatory and you get almost all the gear you need from it - pretty lucky! The teleporter below the starter area is really inconvenient, but I managed to make the best out of it by going back there and dropping straight down to the platform above the teleporter number 2. You only need to hang from the ledge to activate it - no need to go to the same level and than climb back up and take your prize from the elite!
Approaching area 3 can be really fun because of the Death Orb. Grabbing the scroll by not touching anyone and rushing to the star is the way to go. while climbing back up going guns blazing you might initiate the death orb before dropping to the next pit. It will wreck a lot of enemies while you are down there! Just clear everything alternating between the Swift sword and the Wrenching Whip depending of how many enemies you have in front of you. The gem is a drop by a flying enemy … welp, the second one later on as well - don’t forget to grab those. Area 4 is pretty dense but the only rule is to go for the star right away without touching an enemy.
(!!!) I decided to open up the boss teleporter before going to area 5 (!!!) and I will explain why I did it later… it’s not only because of the skill scroll.
In area 5 you have to consider there’s a star at the end and lonesome climbing above it … it’s best to at the middle of the room to stop killing enemies - grab the star by passing through what’s left and than finish it for the extra +5 pts for each kill before going up. I decided the upper cursed chest is better option because I was able to reach the star there while still having my own active. Area 7 containing of course exact number of monsters to lift your previous curse so it’s pretty straight forward. The only thing to notice though is that the star is kinda up there and I feel there’s some time to grab it and go bit back to kill what you passed by through.
Area 8 looks pretty vast but it works wonders for lifting the second Curse + another gem drop and 2 stars + a secret close by. The secret is accessible only from the right side unfortunately. You will double up the stars for sure so kill every enemy before you reach the second elite!

The boss fight takes a lot longer than on previous runs because we don’t have hard hitting gear, but a crowd killers instead. If you don’t have time to go back for the Death Orb you left for the Toxic Cloud I can only suggest using the Cudgel which drops from the last elite and this is why I did the pathing in the order you see! It shortened the fight and rendered the boss inactive like it always does :stuck_out_tongue:

At time of posting #6 in the scoreboard in 14 tries > Leaderboards 26th of August 2018

Couldn't resist at all...

As always GL HF! 3 Hours remaining!

I know I went a bit overboard this time, but the biome info might be useful for the main game as well

10 Likes

You forgot to sign your name on the map… :slight_smile: We all know it’s you though… Great daily run, as usual.

You are always #1 in my book. :slight_smile:

8 Likes

Update to the main post and explanation of the current daily run, including information for the Ancient Sewers BIOME! It’s helpful input about normal runs as well

It’s not strange I’m still at number six, because I almost killed everything in the run, so they don’t have a lot of extra score to grab compared to me. The faster and easier biomes is where even 0 cell daily runs can get you in the top 50s.

See you tomorrow guys and I will try to shorten things up, also don’t forget you can ask for unupgraded 0 cells active runs and when I have the time I will for sure help you out! Cheers!

8 Likes

27.08.2018 Daily Breakdown, Ruin.


Today’s run is a helping and a half of cold serve BS.

Biome - Lothric Castle. Not much to say really, one of the more straight forward areas filled with knights.

Enemies - Step right up good folk, do we have knights for you!? We got knights with swords, we got knights with spears, we got knights of the round table, knights of night, night of knights, knights with axes and hooks in sequined vests impersonating Clark Gable.

Gear

Lol you thought?
Cursed Sword - Good damage, mainly to you. One hit and you’re dead, have fun!
Valmont’s whip - Good for a tickle fight, if only all your enemies weren’t wearing full plate armour.

Pathing

Area 1 - This is where you die. 4 tiers with spear knights and casters both of which attack through walls, ceilings and floors.
Area 2 - BS and crackers, not even good crackers. Gritty, chalky and unseasoned crackers!

Points expected about 0-15.

8 Likes

My work is done for the day it seems :smiley: It’s pretty much on point!

7 Likes