The portals are damn near perfectly placed to efficiently return to every branching path, did you manage to kill everything this time around?
5 Likes
Not at areas #1 and 2, everything else should be really easy.
Area #1 can’t give me speed buff so killing everything there - the 2 pts zombies is just a huge waste of time.
The same applies to area #2 above the second scroll … you won’t have a proper path without looping around to taking few extra enemies out, so it’s not really worth it if you want to reach the boss 
All portals are pretty much perfect except for the one connecting #5 and #6 (boss area) - you will lose some time there climbing twice.
5 Likes
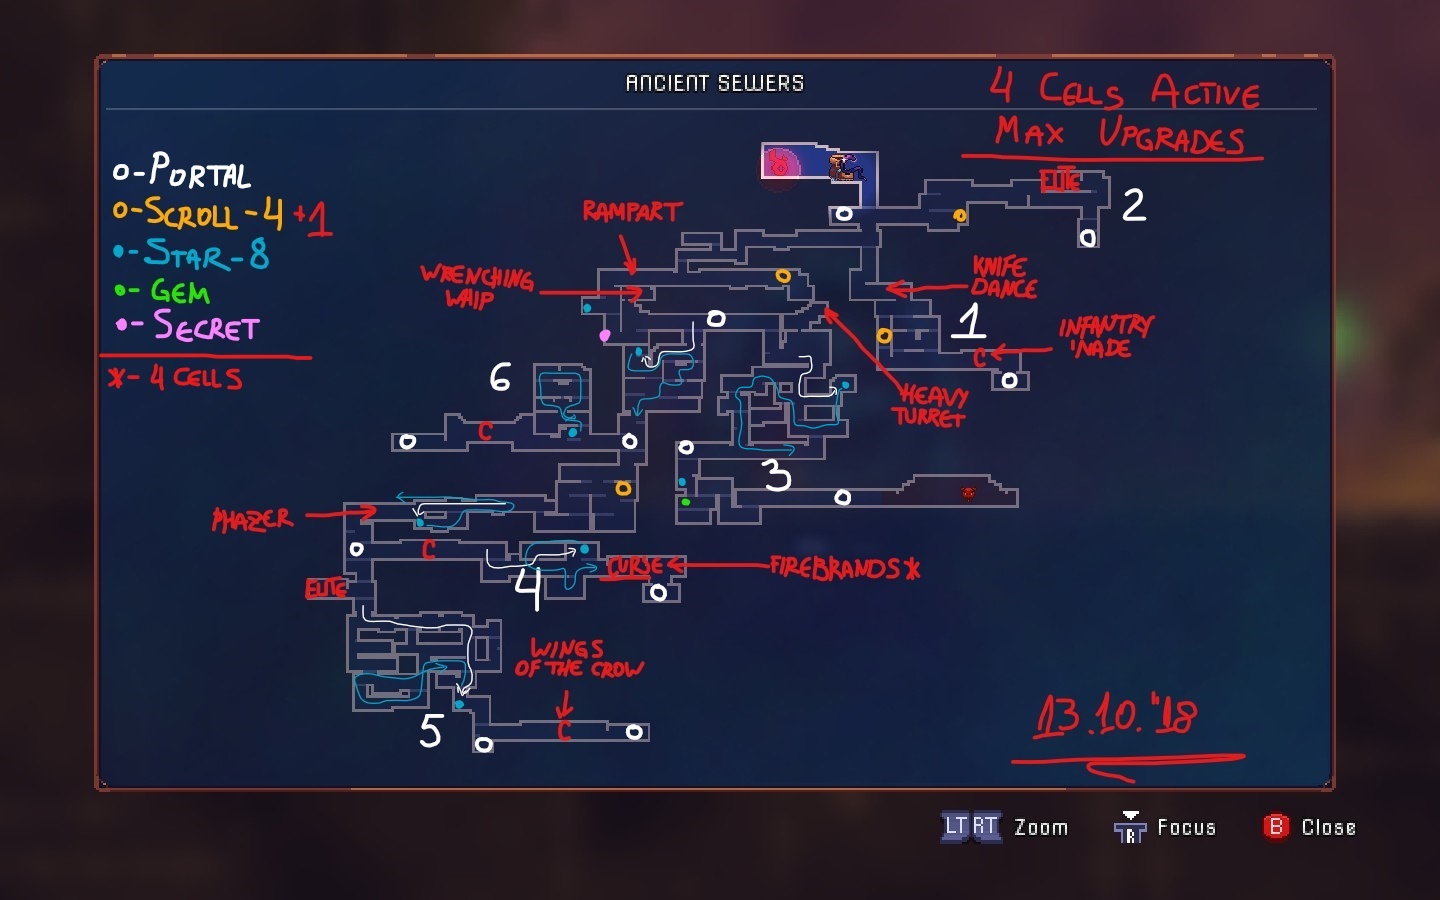
13.10.2018 Daily Run Breakdown
You might want to check my Ancient Sewers Biome breakdown in the OP, if you aren’t familiar with that area by now
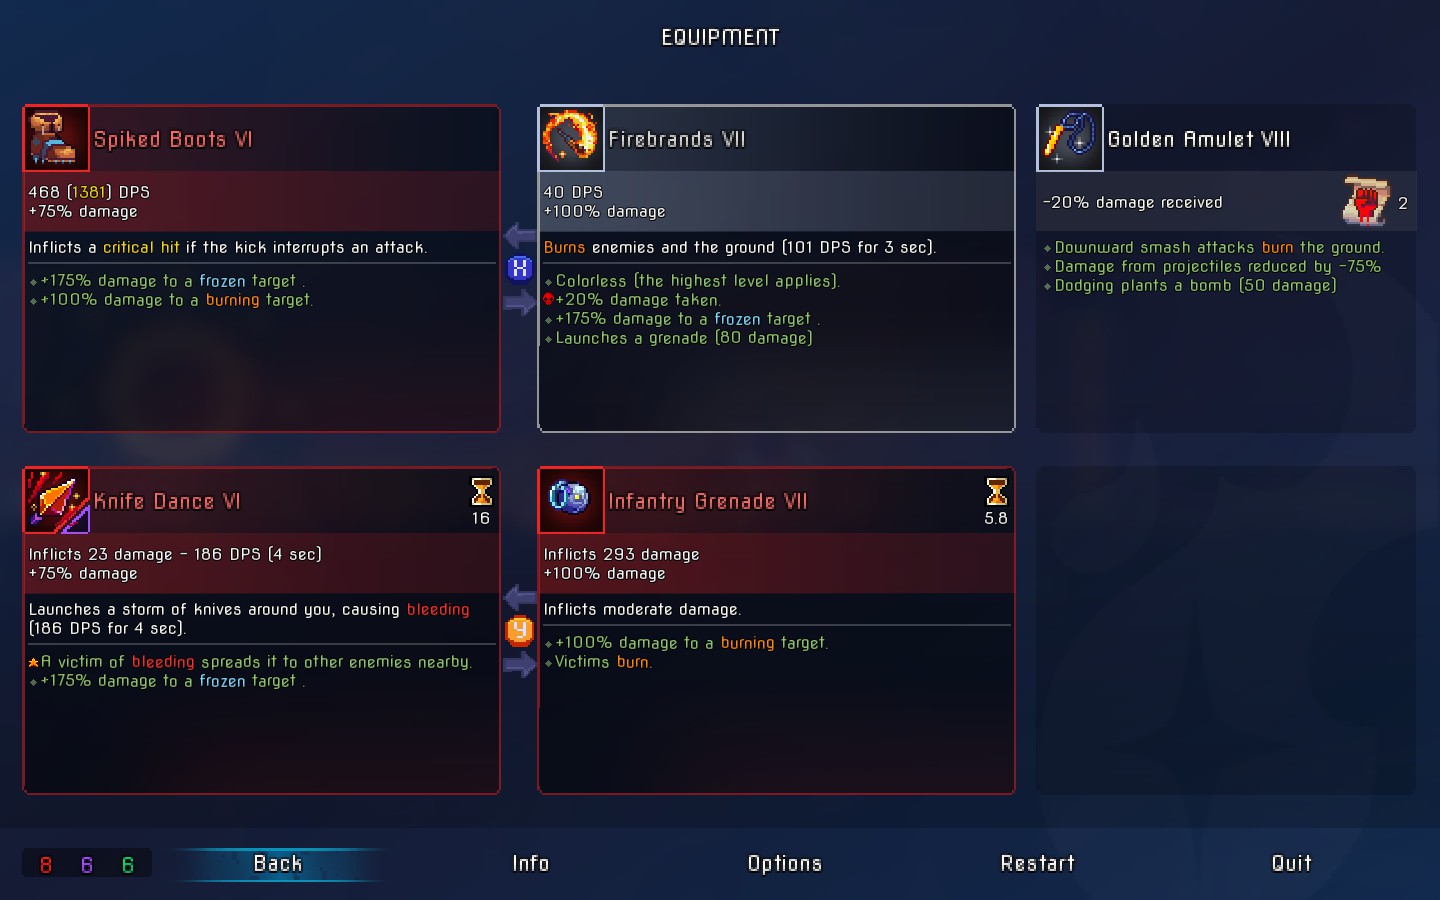
GEAR
Spiked Boots - No questions asked. I finished the run with them with no problems. We discussed them on number of daily runs, but I will just mention again that you can kick the Disgusting Worm’s grenades and kill enemies with ease.
Knife Dance - It clears out the most annoying low health enemies in no time and bleeds out everything eventually if you value your time and constantly move forward.
Infantry Grenade - The low cooldown of 5.8 seconds makes it amazing for this run. You can’t go wrong with it.
Heavy Turret - It might look really slow, but because I had to loop around on number of occasions with Star bonus and the general multiplatform layout of this biome, this turret actually served me really good. When you are about to clear few platforms right next to each other, just drop it on one of them and while you clear the rest it should be done on it’s own. I replaced the Knife Dance with it, because the cooldown of 16 seconds wasn’t working for me compared to only 10 for the turret.
Firebrands - It’s a Cursed Chest drop on 4 Cells Active, so might not drop for you, but you don’t really need it. I barely used it and mainly against the boss just to keep him burning. There are few alternatives which for sure will drop on whatever cells runs:
Extra option
Rampart - If you are confortable with a shield, here’s one! Only 2 shields are able to work on this hectic biome and they are the Assault Shield and this one. The Rampart blocks tons of damage and when you land a sucessful parry it generates a force field for 3 seconds during which you are completely immune. Give it a try if you are a shield user.
Wrenching Whip - It’s there, so why not pick it up as a second weapon? It can take out the Shieldbearers (reminder - it goes through shields) and the flying enemies with no problems!
Phazer - You might give it a try in this run if you wish. It might speed up things for you, but I decided the rest of the gear has way more killing potential, so I don’t see any reason to experiment with this for today’s run.
Wings of the Crow - Welp, if you haven’t unlocked it in the main game yet, you have a nice free chance to try it out. The blueprint is dropped by a Golem in the Slumbering Sanctuary phase 2 Biome  24 seconds cooldown… oh boy… This thing is only decent for low HP enemies so it might be actually useful here, but I don’t want to bother with it.
PATHING
Area #1 - Pretty simple - 1 Skill Scroll and Knife Dance + Infantry Grenade - the starting gear.
Area #2 - The second Skill Scroll and an Elite from whom I got +2 Brutality amulet which is even more damage boost.
Area #3 - Here you can get the Rampart shield or the Wrenching Whip if you wish after grabbing the 3rd Skill Scroll. I decided to go for the Heavy Turret and just went all the way unlocking the boss path. Make use of the 2 stars, the secret and the gem drop of course.
Area #4 - 3 Stars and the last 2 Skill Scrolls, one being from the Cursed Chest.
Area #5 - At this point having all the necessary gear it shouldn’t be scary to take down the Elite (regular zombie on 4 cells active) while being cursed. It’s pretty big labyrinth so you shouldn’t try to kill every enemy at all. The star is right at the end so you will have to circle back up so on the way down you shouldn’t kill much enemies.
Area #6 - Simple loop with the star to go up and back down, really nothing special and you are already set for the boss.
Boss Fight - The boots will totally destroy him and you will be immune most of the time if you opted for the Rampart shield. It’s easy fight with whatever you decided to use - about 10 seconds long.
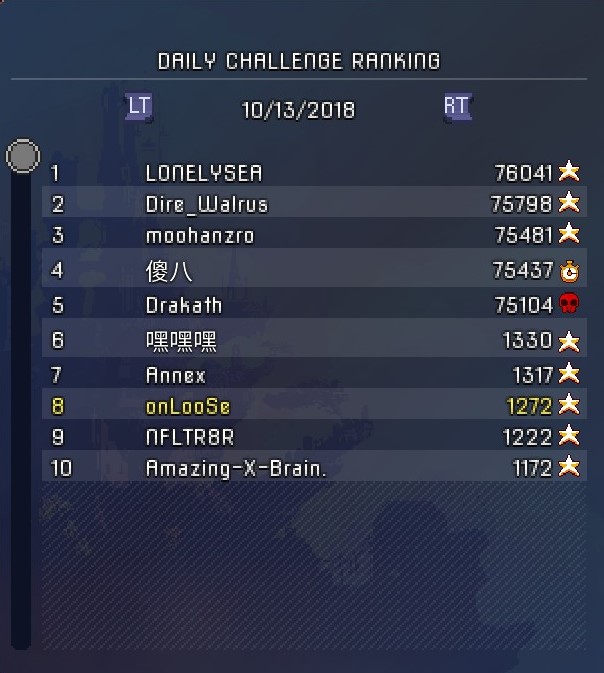
The official Leaderboard is down today and it doesn’t connect me to the server in the Beta branch at all, so RIP that.
GL HF and cheers!
8 Likes
14.10.2018 Daily Run Breakdown
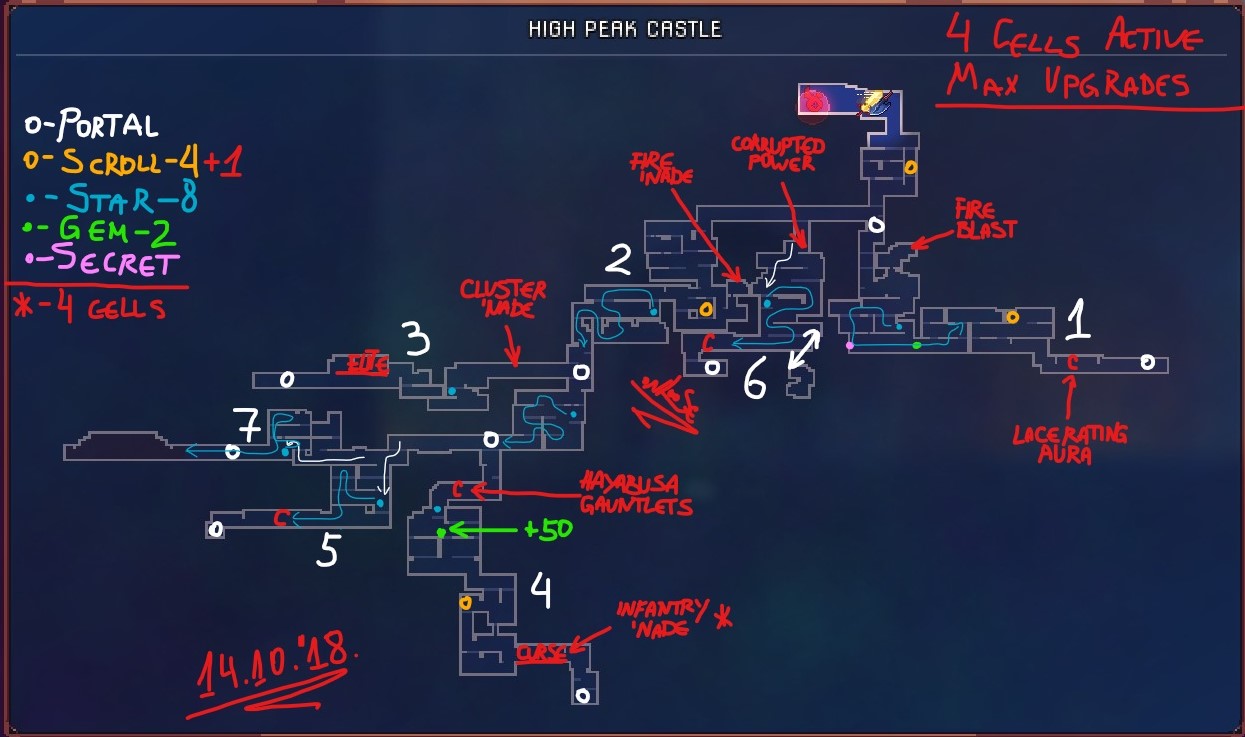
Today’s Biome is my … Natural Habitat - Bulgaria It’s nasty and annoying, but a bit of genocide is possible and required!
GEAR
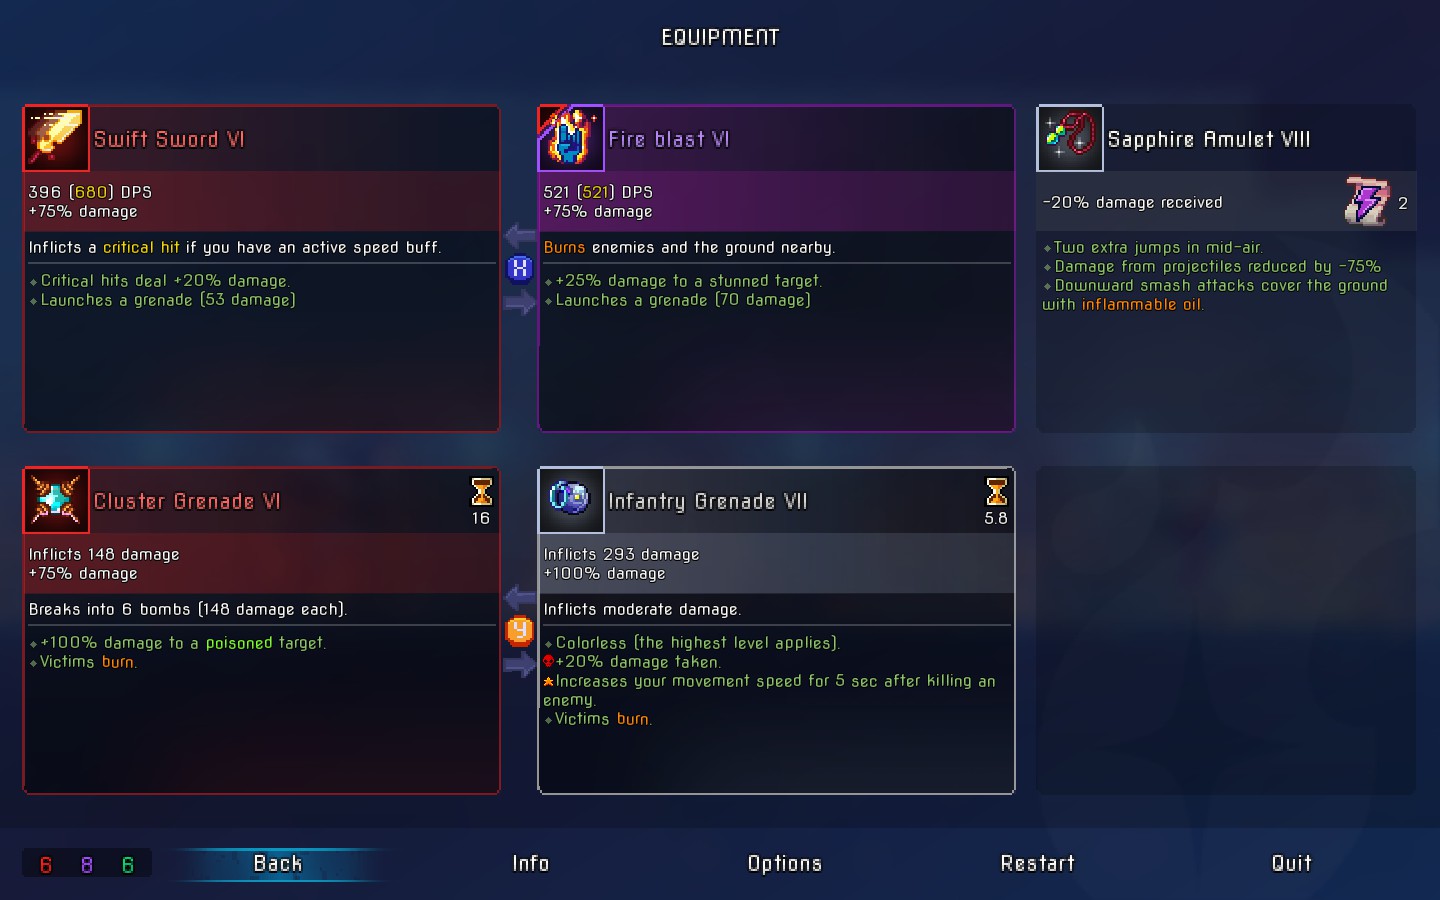
Swift Sword - This starting weapon served my right until the very end of the run. If you maintain your speed you will be golden.
Fire Blast - I had to pick it up for the Boss Fight, which was unfortunate, because getting it is a lot of time waste, but if you skip it you will lose even more time at the last fight. I never dared to use it before the very end.
Lacerating Aura - The 30 seconds cooldown makes it really bad option, but it’s an ok start to deal with the Guardian Knights and the rest of the enemies will die in a second.
Fire Grenade - The first really useful pick up. It will save you a lot of time so use it against every cluster of enemies you pass through.
Cluster Grenade - It’s devastating. Probably the most powerful grenade in the game in the current patch. This should kill everything in one toss so use it wisely to save as much as time possible.
Infantry Grenade - Being dropped from the Cursed Chest might not drop for you on anything less than 4 Cells active, but the Fire Grenade I replaced with this should get the job done no problems as well. I took it because of the really small cooldown - 5.8 seconds, so it was always ready when I faced new cluster of enemies.
Extra option
Hayabusa Gauntlets - They do a bit more damage than the Swift Sword, so they are a valuable option, but the low range and 5 hit combo is a bit off putting for me. You might try to consider them if you can’t maintain speed buff for long.
Corrupted Power - It gives significant DPS output for 8 seconds, but don’t forget you will take +30% extra damage while the effect is active. I wanted to make it work for this run, but really couldn’t make it perform better than the Grenades and the 30 seconds cooldown made it unusable for most of the places where it would have shined over the 'nades. It’s there so you might give it a try, because I doubt you are picking this up in a regular runs
Knockback Shield - I know it’s not on the map, because it’s one of the worst things you can get in a daily, but if you want to get some fun and toss enemies further away from you instead of killing them for points - go for it It’s in the chest in area #5 right under the boss!
PATHING
Area #1 - Get your Swift Sword damage active right below the starting room - you don’t need to have the double arrow icon to have the criticals apply - the sound queue of a critical strike should be enough of a key when you have it on and just drop down. Grab the Fire Blast if you are wasting tons of time during the boss fight like I did and than everything else should be clear - the second Skill Scroll is the last thing you should grab and before that make use of the Star, the secret and the gem drop. You will need the Lacerating Aura from the chest before you get the next 2 Grenades.
Area #2 - Pretty simple area. It’s just there so there’s no confusion where to go in general.
Area #3 - The Cluster Grenade which will obliterate everything and the only Elite encounter. Hopefully you will get better stats amulet from it compared to me… +2 Tactics wasn’t really useful, but the oil was kinda ok (you can check it above in the “End Gear” drop down screenshot).
Area #4 - The last 2 Skill Scrolls are here while one is in a Cursed Chest, but most importantly there’s a +50 pts Gem drop on 4 Cells (hopefully it’s still there on whatever you are running).
Area #5 - Pretty standard - just loop a bit with the Star.
Area #6 - Again simple loop with the Star here and don’t bother going through the Rune portal - it’s pointless.
Area #7 - The star is right at the end of the enemies, so this is the most annoying circle you have to do, but I doubt you will have a lot of time left on the clock. I can only suggest to go up and than drop down and just bail with whatever 15-20 secs you have left.
Boss Fight - Hopefully you picked up the Fire Blast 
The official Leaderboard is again down today and it doesn’t connect me to the server in the Beta branch at all, so RIP that.
GL HF and cheers!
7 Likes
So I tried this one a couple of times, these are enemies I haven’t even seen in the real game yet, lol. So I got screwed over really quick. Why does everyone attack through floors, and those guys with the spears, they not only attack through walls and floors, they aim in all directions… lol…
4 Likes
The Lancers attack only horizontally and vertically You should just get the hang of their combo and the single vertical attack it’s just a bit of practice! If you dodge pass them and their 3 hit combo before the first or after the first attack - there’s some chance they will turn around for the 3rd attack
You should be familiar with the Inquisitors (spellcasters) by now from the Ramparts Biome, but you should really get used to them, because sooner than later you will see them almost everywhere.
This is the most rough biome, so don’t get that scared. Before I acquire few scrolls for damage increase I kill only few enemies and pass the rest so I can only have my speed buff going.
BTW I was sitting half of the day in top 30 with a new save file I started yesterday which has only like 10 regular game runs to it’s name and 1 cell active and this was the first daily run, so I didn’t knew the map at all. So going low cells is totally doable for top 50 - no problems. It’s just a bit of getting used to the different mentality for the Daily compared to the Regular runs.
4 Likes
I hate those Inquisitors… lol…
I will try the daily again when it’s in an easier setting…
4 Likes
15.10.2018 Daily Run Breakdown
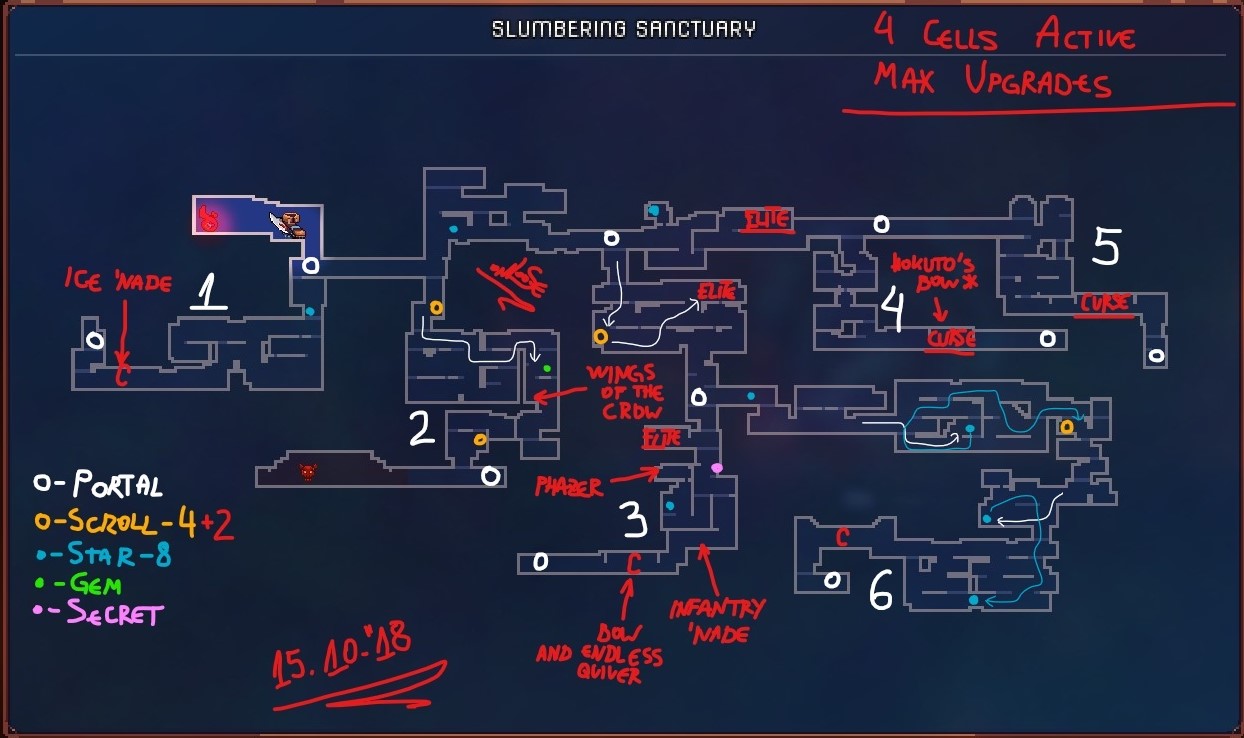
It’s an Slumbering Sanctuary version 2 biome, which means it’s the enemies that wake up from their slumber after you press the button on the regular map in a normal run. This is probably one of the most unforgiving bioms so don’t expect it easy on you.
GEAR
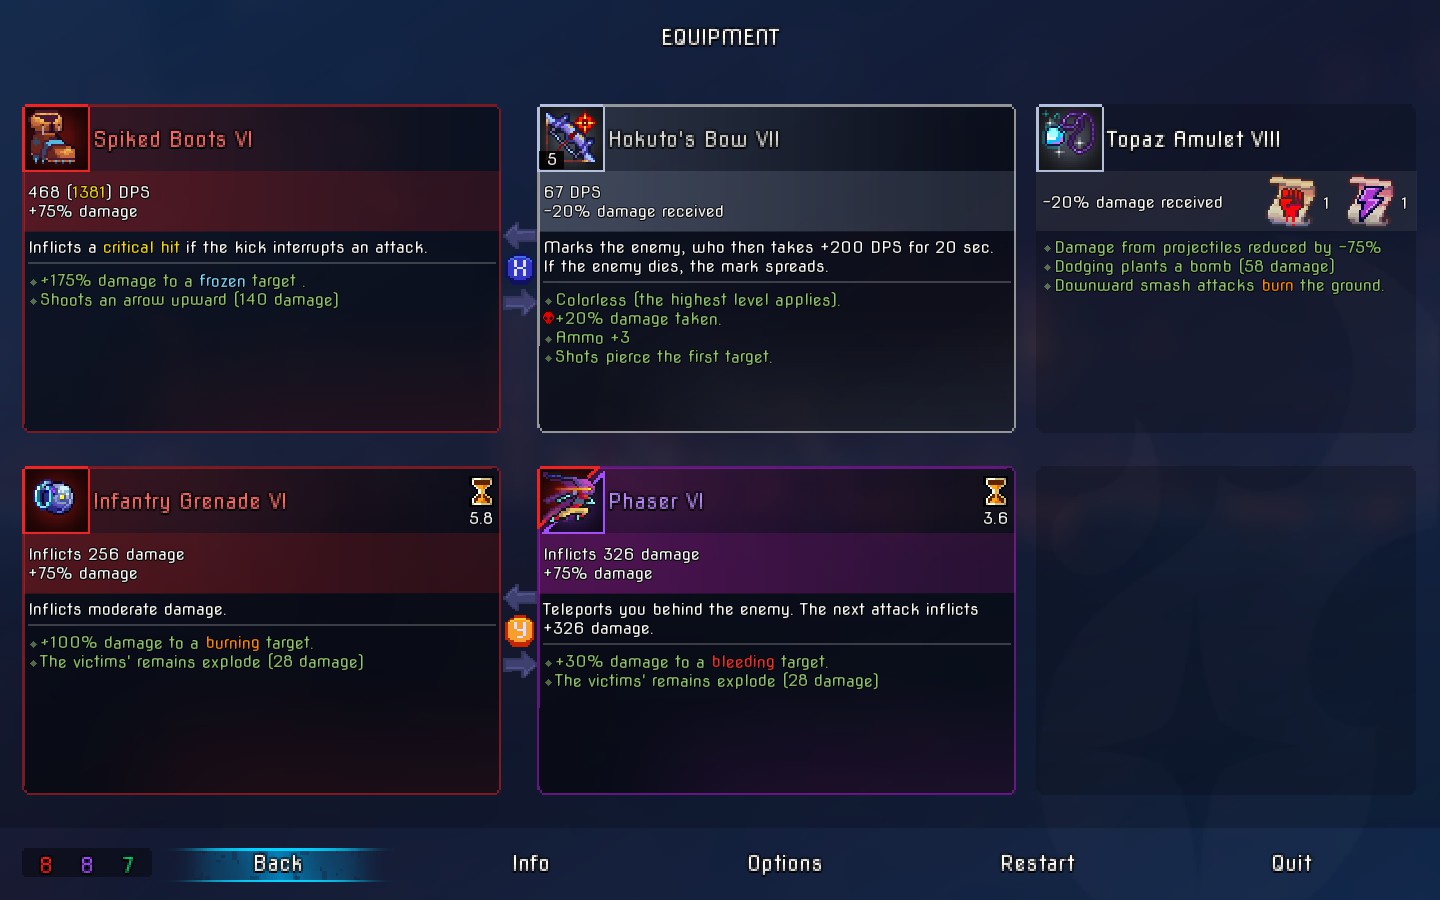
Spiked Boots - No questions asked. I finished the run with them with no problems. We discussed them on number of daily runs, but I will just recap the most important things about them:
You can kick enemy grenades and kill enemies with ease, which includes Grenadier’s ability in this biome.
You do critical attacks while the enemy is initiating an attack against you which is really useful against the boss and you can just tank him. Strange and powerful combo with the Ice Grenade coming up down below.
Even if you hit an enemy while it’s charging an attack with this weapon, it will not actually interrupt it. Take caution when dealing with enemies capable of fast attacks or have really high Breach cap like the Golems here.
Ice Grenade - Usually not useful for daily runs, because it does almost no damage and has 18 seconds of cooldown. Of course you want to kill enemies… not toy with them, but this beauty here can help you to deal with the Golems - NO PROBLEMS! In the early game when you don’t have enough damage yet you will be in a lot of trouble, but this grenade freezes everything in it’s range in the exact position the enemies are in when it activates. This means you can land a kick or 2 to the Golem when he winds up for his forward dash attack and before he initiates it you toss the grenade, which freezes him in attack position so you are still doing criticals with the Spiked Boots. Don’t forget after the very first damage you do the enemy is instantly unfrozen, but in a slowed down state which will open a time window allowing you to land few more hits. Usually you won’t have much trouble with the golems with this little combo.
Phazer - It can really help you close the distances and save a lot of time. On top of everything else you can use it to avoid the Golems’ attacks if your Ice Grenade is on cooldown.
Infantry Grenade - I replaced the Ice Grenade eventually, because I had enough Skill Scrolls already to justify the damage of this gear piece and don’t forget the 5.8 cooldown is just amazing. You might want to decide to stick with the other Grenade, but this might prove to be more effective, so what works for you is fine.
Hokuto’s Bow - We used it few times before, but just in case - it increases your DPS with additional 75 from all sources for the next 10 seconds while the debuff can spread to nearby enemies. This means one arrow in one of the enemies can lead to easy wipe of whole area if you find the correct order of taking down the enemies one by one. It drops on 4 cells (I tested that it drops on 1 cell as well, which means there’s high chance it’s there for 0 cells as well) and it’s in a Cursed Chest, but don’t worry about it much - I barely used it. Of course it will increase your damage significantly which will shave a lot of time especially in the boss fight and can take out the Kamikaze bats with ease, but there’s another alternative for that in the Extra options down below.
Extra option
Assassin’s Dagger - This is the other starter choice next to the Spiked Boots. I didn’t gave it a spin this time, but it can really work in this run, because of the Phazer and the Ice Grenade you can take full advantage of this nice weapon. It does 3x damage when it strikes an enemy from the back (only if the enemy has a back though… and there are some that don’t like the Protector dummy in this biome). It’s a worth a try if you are up to it.
Bow and Endless Quiver - This is the Hokuto’s Bow alternative and you can get it way earlier or if you don’t want to risk with the Cursed Chest. By “alternative” I mean it can help you mainly about the Kamikaze bats don’t expect it to be damage beast or whatever, at least shoots fast.
Wings of the Crow - Here they are again… I don’t know why I picked them up, because I never used them They are still fun though.
PATHING
Area #1 - Don’t worry, you can skip the Golem here if you aren’t feeling confident going at it with only your starter weapon. Taking the Ice Grenade from the chest can’t excuse you from bailing on the next encounter though.
Area #2 - 2 Skill Scrolls and that’s pretty much it, except if you don’t want to have fun with the Wings of the Crow, but we aren’t about fun here
Area #3 - It’s a long run for sure. You might not have the upper Elite (the middle one on the map) on lower than 4 cells, but it’s worth it to go here for the Scroll and for the Phazer at least early on. Don’t waste much time in the scroll room - there are plenty of enemies there.
Area #4 - Another Elite and after that you will get cursed for +1 to every skill point and eventually the Hokuto’s Bow.
Area #5 - Curse breaker area + getting another curse for +1 skill point - the irony.
Area #6 - 4 stars and the last free Skill Scroll. 4 stars is pretty big deal and the good part is that you should be able to take the most out of them by having the maximum damage available there for this run. This is for sure the highest scoring area.
Boss Fight - Meh…
The official Leaderboard is again down today and it doesn’t connect me to the server in the Beta branch at all, so RIP that and it’s shame… My second #1 place won’t be recorded for the history
Currently #1 in the Live version of the game in about 30+ tries.

GL HF and cheers!
8 Likes
WooHOOO!!!


4 Likes
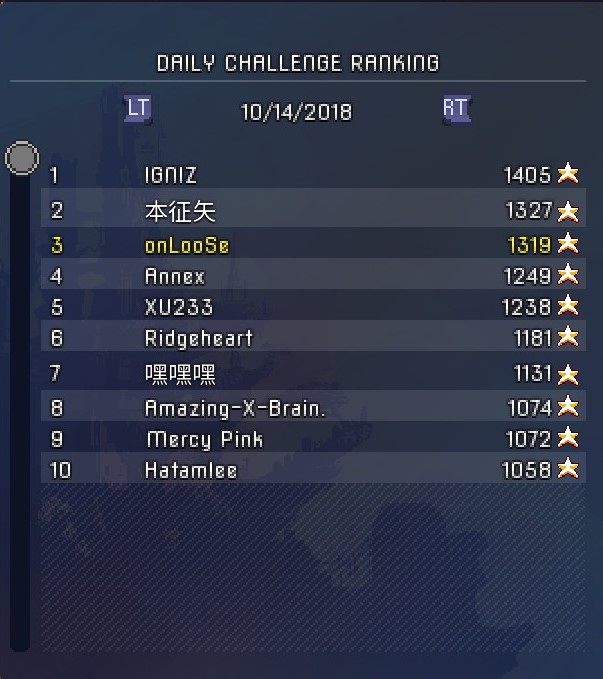
BTW I was stuck at #3 for ages with 1178 points - one less than the current #3 guy and this was eating me alive… so that’s why I didn’t posted like hours ago . Had to think how to beat him and ended up beating everybody … lol.
4 Likes
16.10.2018 Daily Run Breakdown
First of all - the official Leaderboard is back!!! One day too late for my sake, because of the #1 spot yesterday, which will be lost forever ;(. The live version of the game isn’t updated yet, which is strange, because the leaderboard was showing people playing on the Beta branch update the last few days before it stopped working completely. Probably they just switched it to show the current live patch from 29.08.2018.

GEAR
Frantic Sword / Hayabusa Gauntlets - I don’t think it matters that much what you are going to pick in this run, especially when you will get new gear really soon. The Frantic Sword has more range to it, but it’s slower - it was exactly the same outcome when I started with either of them.
Pyrotechnics - Yep! It’s here and on top of that really close to the start! This is one of the most OP gear pieces in the entire game in the current live patch. Have fun with it ;]
War Spear / Wrenching Whip - One of those will be your crowd control weapon and they are pretty tied with their respective pros and cons. The War Spear of course has a bit more wind up before it starts it’s combo, but some hits go behind you which is insane pro for this biome. The Wrenching Whip attacks through shields and makes far better work to the Shieldbearers, but in this dense area having to constantly turn around to protect your rear is huge con for me. Both are viable, but I felt more comfortable with the War Spear.
Death Orb - It’s slow but there’s no another alternative so make the best out of it. Being slow balances it out by being really powerful - it will devastate everything in it’s path so toss it on a platform and go do your business elsewhere while it takes care of the enemies. When it hits a wall it will vanish so don’t forget that. The 16 seconds cooldown ain’t that bad either.
Powerful Grenade - This is the more decent option available today. It’s the second most powerful grenade after the Cluster Grenade talking about raw instant damage. When you get your Skill Scrolls it should kill everything in one toss - no problems with 15 seconds of cooldown.
*Oiled Sword - It probably won’t drop on lower Cells active, but don’t worry - the War Spear or Wrenching Whip are decent enough, even so I’m considering not picking it up to try fight for the #1 place, because this weapon only helps me against the boss.
Extra options
Throwing Knife - You can either make it really harder on yourself by not taking Pyrotechnics for this one or go full ranged damage over time. While this bleeds enemies out the Pyro - burns them so comboing both is doable if you wish.

PATHING
Being the very first Biome - yes, it’s possible to kill everything and I had no problems doing so.
Area #1 - Pyrotechnics right off the bat and that’s totally justified on it’s own. I go grab the first Skill Scroll next to the first teleporter, so I can make my way faster through this area.
Area #2 - All the free Skill Scrolls - 4 and your crowd control weapon option.
Area #3 - You have to run again from the first portal to the very right, but having the extra gear available now is a must to speed things up for the rest of the run. It contains only 2 stars so make use of them.
Area #4 - This place grants you the last +1 Skill from a Cursed Chest and the only Elite in the run, which will hopefully give you an nice extra stat amulet.
Area #5 - 3 stars and a pleasant surprise - hidden through a rolling room, there’s a whooping +1000 pts Gem (I drew the path on the map and be careful with the spikes though). This area will legit double everything you can get from the rest of the map.
Area #6 - Simple 1 star place right before the Boss fight. Nothing fancy.
Boss Fight - Without the Oiled Sword this fight will take a lot of extra time with the Pyrotechnics alone, because bosses develop resistance to elemental damage the more you hit them. Probably you should try using the War Spear or Wrenching Whip more if you don’t find inflammable oil gear on the way.
At time of posting #2 in the Leaderboard in 15 tries > [Leaderboards 16.10.2018]
If someone has some ideas how to catch up with 189 - 190 points for the #1 place, I will be really happy to hear them!!! I don’t want to get this guy slide today, when finally the Leaderboard is back…
GL HF and Papa Bless
7 Likes
And the Leaderboard is down again… it seems it’s Hollow Knight evening
3 Likes
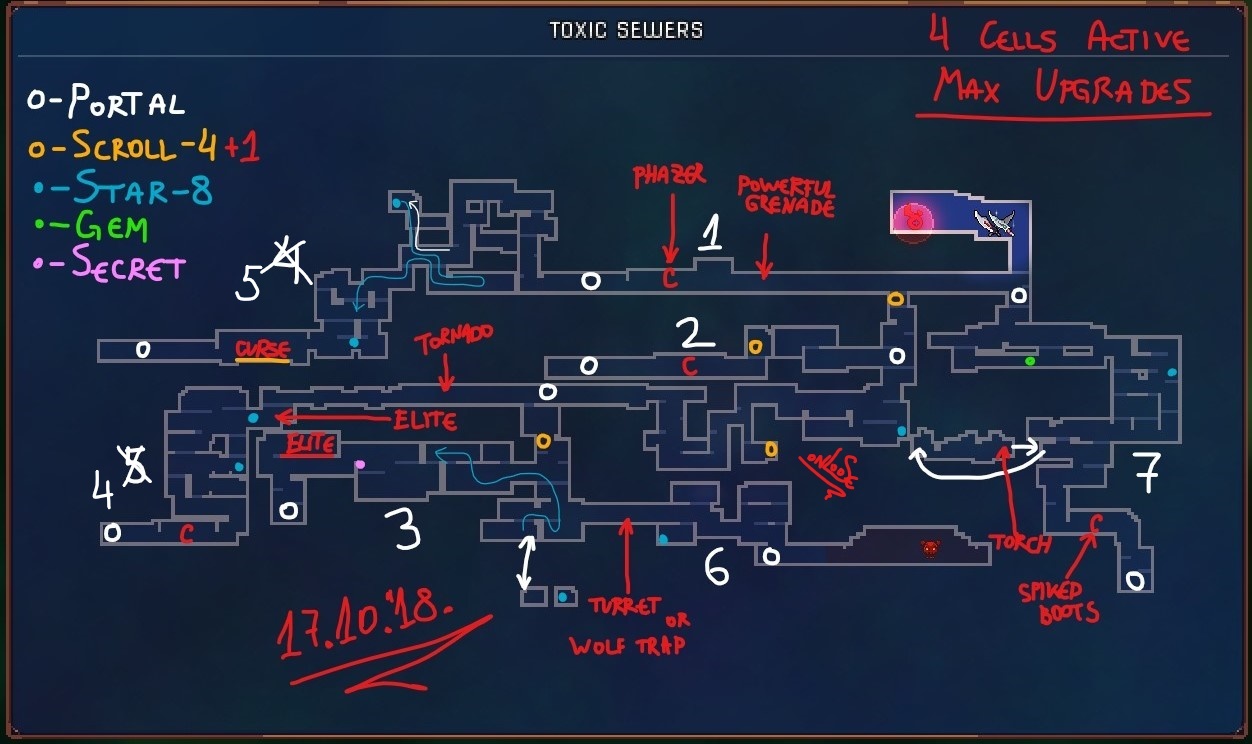
17.10.2018 Daily Run Breakdown
GEAR
Assassin’s Dagger - This time I did pair it with the Phazer and it performed amazing! I think it’s more viable option than the slower Twin Daggers for this run.
Powerful Grenade - Get’s the job done by having such big area of explosion and pure raw power. 15 seconds cooldown.
Phazer - Really great that’s so close to the start of the run and was probably the best thing you could get for this particular layout. I was really doubting to switch it with the turret and that’s why I went for the Double Crossb-o-matic really late.
Double Crossb-o-matic - It will make your life easier for the last area and the boss.
Torch - Mainly took it for the boss so I could kill him way faster with the burning damage it provides and the Assassin’s Dagger is hard to use against phase 3 Concierge, but if you don’t like it there is an another option listed below.
Extra options
Spiked Boots - They are pretty good alternative against the boss so you might use them. Hell, you can even go grab them early on and do the run with them. I discussed them plenty of times so at this point it’s pointless to mention what they can do.
Tornado - It’s an option and can do some nice kills on it’s own. It inflicts damage over time to all enemies caught inside it and changes direction when it hits a wall. I didn’t went with it because of the slow cooldown - 24 seconds is pretty expensive price to pay, but if you want have fun with it.


PATHING
Area #1 - It’s really funny area… not a single enemy in sight. Just grab the gear and DON’T BREAK THE DOOR after the Phazer chest - open it and go back from the portal to the previous one - I will address this in area #5 description.
Area #2 - 2 Skill Scrolls and a chest with few enemies - pretty simple.
Area #3 - Another 2 free Skill Scrolls, an Elite (hopefully will give you good amulet) and 2 stars. The second star is via the teleportation rune down the bottom so don’t forget it before heading for the Elite.
Area #4 - Now having almost maximum damage possible for this run I decided to switch areas #4 and #5, because the second star there is really close to the exit area portal and this can be used in the new area #5. Here I got a roaming Elite in 4 cells, but in 0 and 1 cells active he is situated in area #7.
Area #5 - There are few enemies roaming around right at the starting portal and that’s why you have to close the chest door in area #1, instead of breaking it. Now you can get advantage of those enemies and refresh your speed buff while also getting few extra points of the second star in the previous #4. Don’t forget to get cursed at the end ;]
Area #6 - Drop down, pick up the turret instead the Phazer and you are set to clear out the enemies there.
Area #7 - I saved this area for last and took the Double Crossb-o-matic before it, because in 4 Cells Active it’s huge mess on the long flat platform before the Star! There are tons of enemies - 15 at least + the usual popping out of the ground Scorpions for this Biome. I died few times here when I didn’t had much stats and good gear. On 0 cells it was pathetic spot though I think there was nothing dangerous.
Don’t forget to grab the Torch or the Spiked Boots for the boss fight.
Boss Fight - Meh…
The official webpage Leaderboard is dead again… of course…
Currently #1 >

GL HF and take care!
8 Likes
This man is on the loose, someone catch him!
6 Likes
they just take a look at your score and if its in the first place the quickly disable the web leaderboards
they dont want to acknowledge your superiority and pure talent
6 Likes
This made my day @Enki! Thank you very much !
It’s just a bit of dedication and practice, I can’t even say it’s reflexes at this point, 'cuz of my age
So far the Official Leaderboard is working, but I doubt this will be the case 'till the end of the day like the last week or something . But the daily though is pretty interesting and I’m jumping all over the place via portals, so there are tons of possible routes. I have to deal with one cheater and of course the way too familiar for me “guy who better stays unnamed” before I post it, but I think I may have a plan that will work… hopefully. I just have to take care of some work stuff before I can try to pull it off, though 101 points (so far) will be really steep slope to climb.
7 Likes
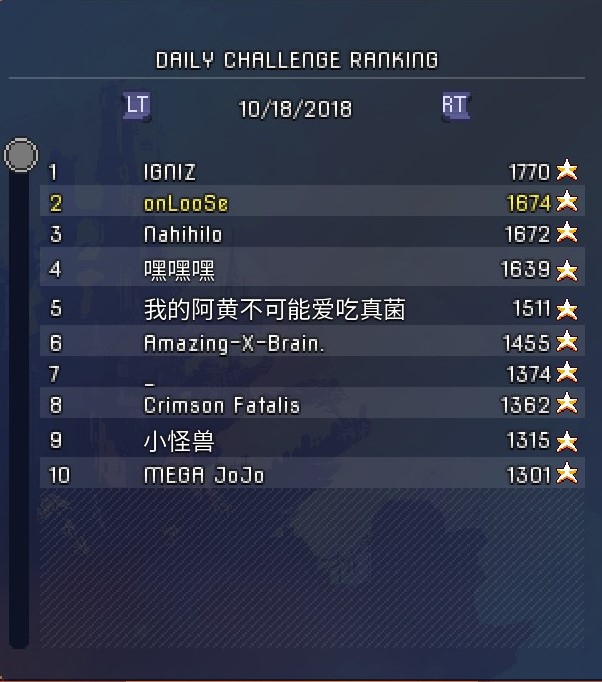
18.10.2018 Daily Run Breakdown
Yes the leaderboard broke again and I’m just gonna leave this here…
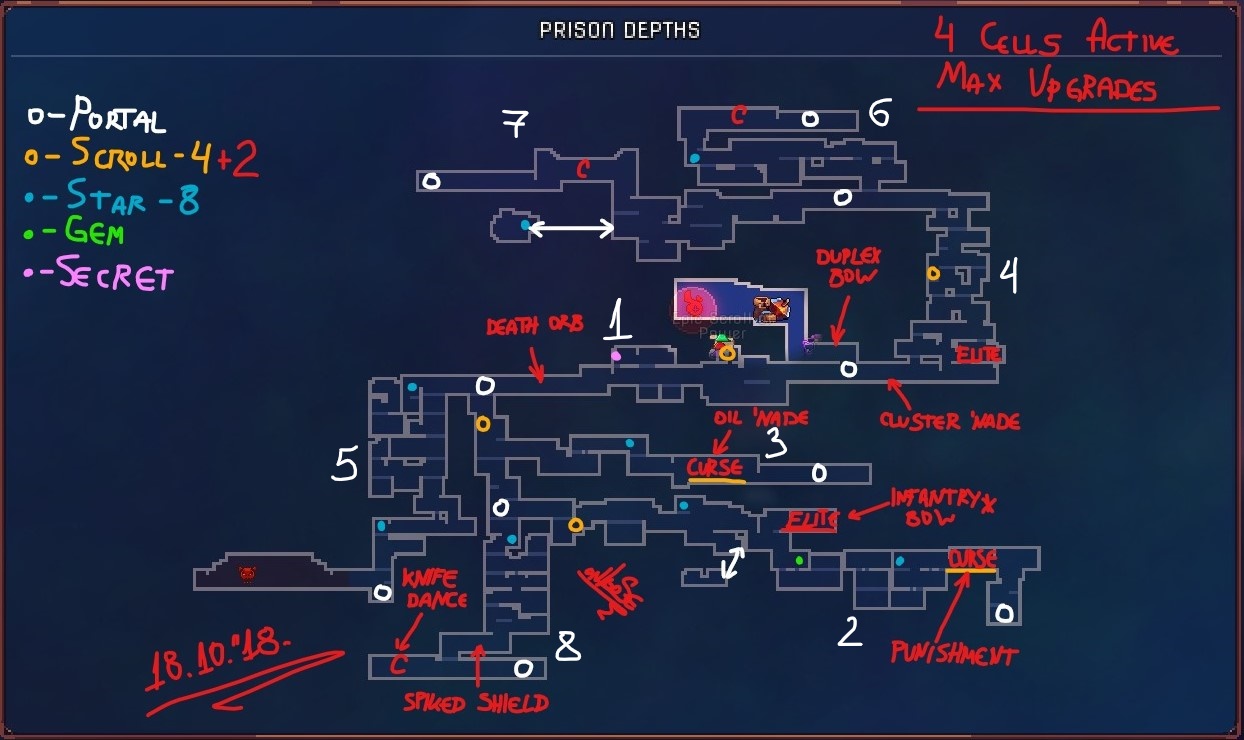
I don’t know what he is doing and I’m really tired of trying to figure it out so I don’t have the strength to break it down today and it’s 2 hours left anyway! Those 96 points… I don’t see how they are possible. I don’t think that’s cheating at all - it’s just perfect pathing/routing as good as it can get.
8 Likes
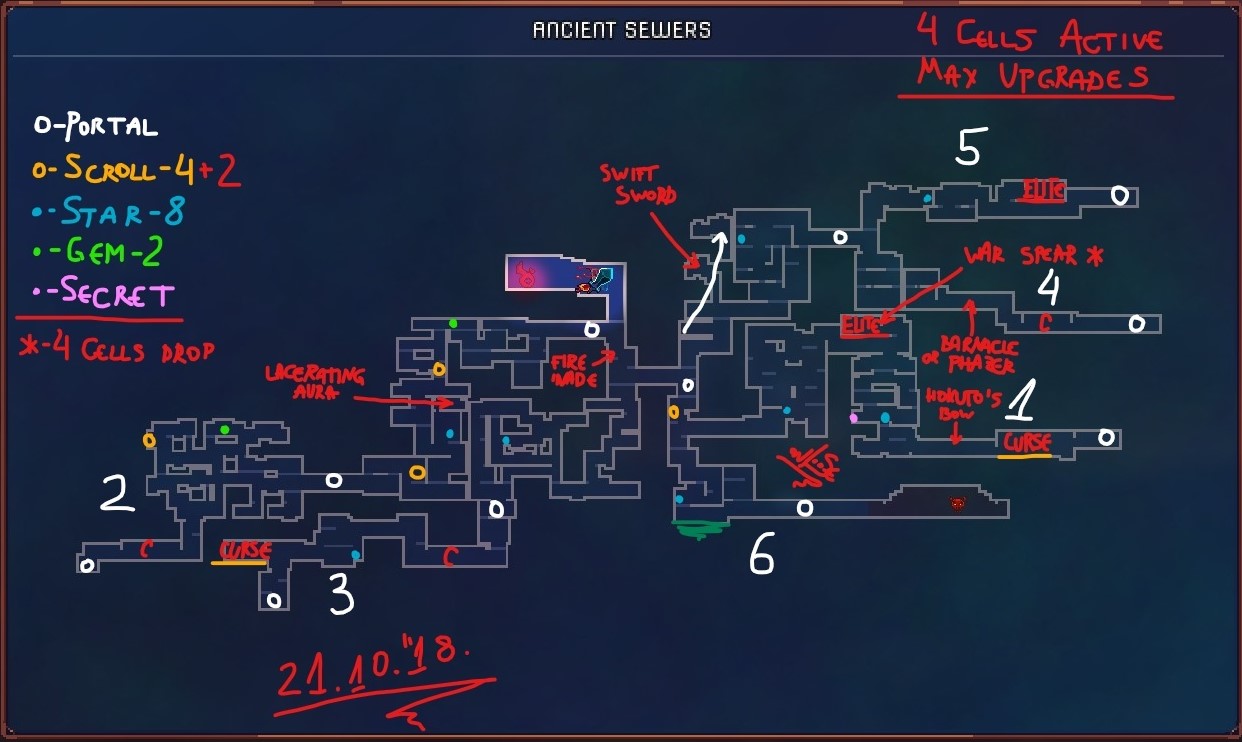
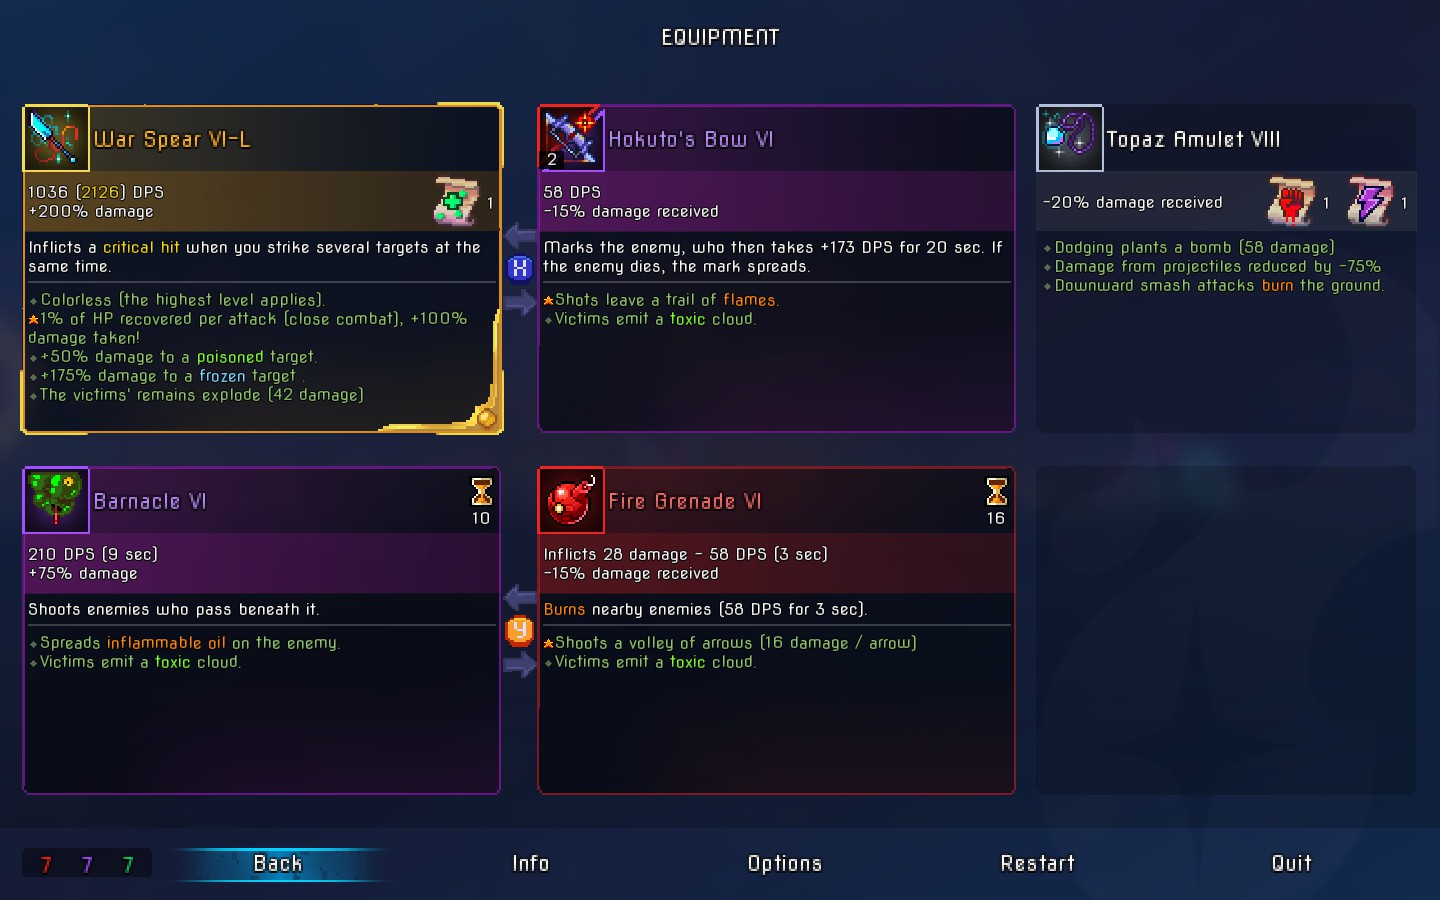
21.10.2018 Daily Run Breakdown
Check the Biome description in the OP if you aren’t that familiar with this area… it’s pretty different from the rest.
GEAR
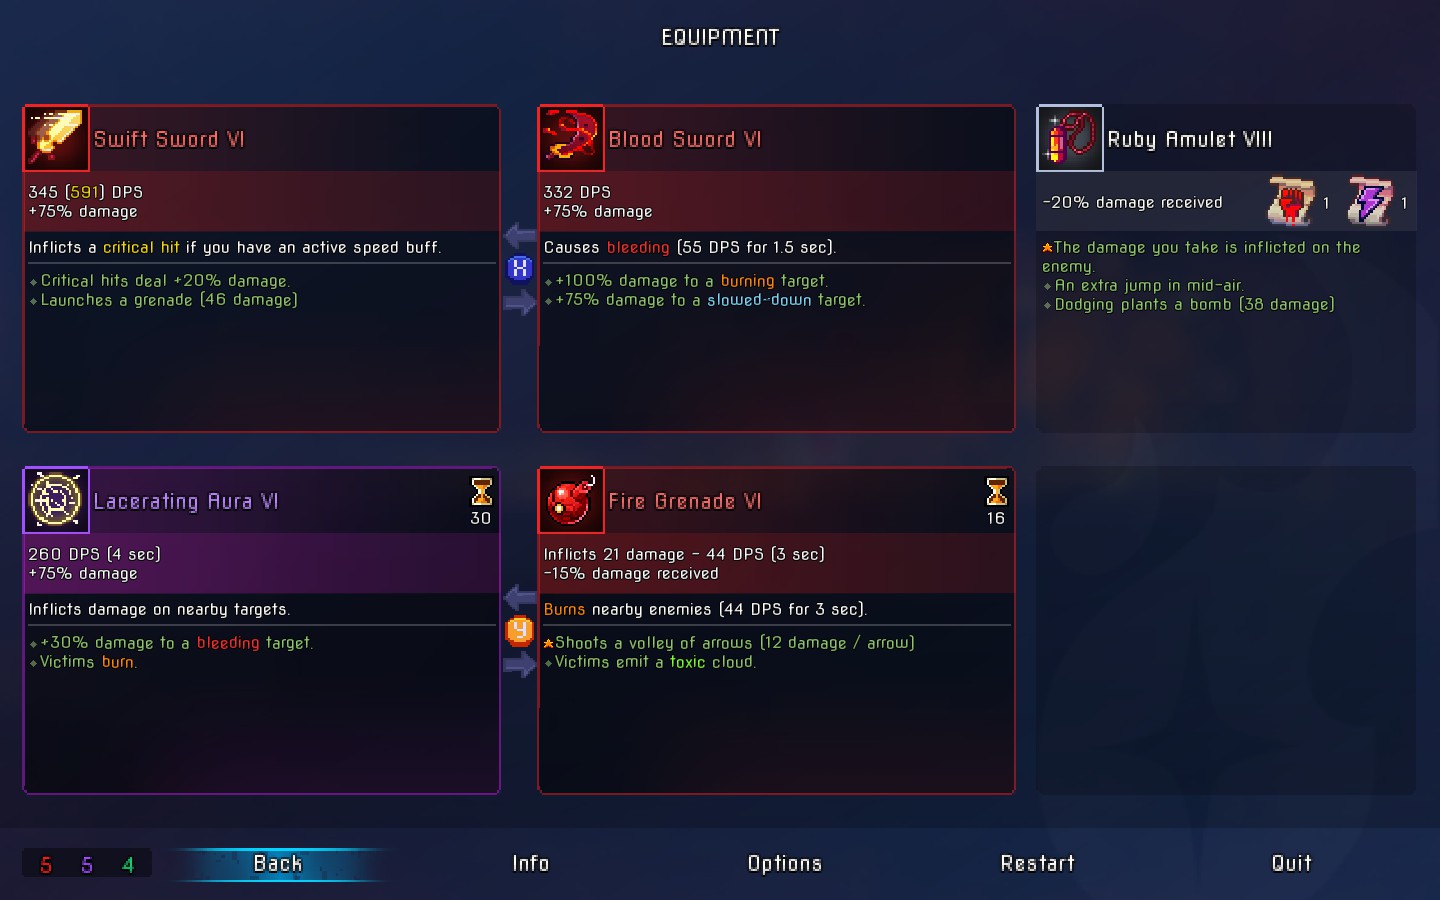
Blood Sword - Compared to the slow Survivor Broad Sword it’s a must pick and it’s not bad weapon at all - you can finish the run no problems with it.
Fire Grenade - Destroys everything - simple as that
Lacerating Aura - The slow cooldown is really bad, but in this case there’s no other choice for good DPS.
War Spear - * It probably won’t be around in less than 4 cells active, but don’t worry, except for the Blood Sword from the start there’s an another option - the Swift Sword and you can just do as fine with them compared to the Spear.
Hokuto’s Bow - Yet again it makes killing so much funnier and easier… there’s no secondary weapon alternative when this is in the Daily layout.
Barnacle - Wasn’t really useful this run and that’s why I delayed picking it up 'till almost the very end. It did great job with the boss though. You might wanna try to keep the Lacerating Aura instead of it if you are going to go Blood Sword / Swift Sword.
Extra options
Phazer - I didn’t tested it at all for this, because I needed a lot of killing potential, but it’s there if someone want’s to try it. It’s never a bad pick.
Swift Sword - If you don’t have the option of the War Spear you might consider this instead of the Blood Sword if you can go fast, that is …
PATHING
Area #1 - I went here first, because of the War Spear with which I did my highest score. There’s an alternative route down bellow if you don’t get the spear in your cells active. Grabbed the Fire Grenade and went straight for the Skill Scroll - it’s not optimal to go to a two star area when you don’t have much of damage and gear early on, but in this scenario it works better this way.
Area #2 - Grab the rest of the free Skill Scrolls here + the Lacerating Aura for as much as dps as possible.
Area #3 - Curse Chest = skill scroll and 2 stars before it… pretty simple
Area #4 - You can grab the Swift Sword here if you don’t have the War Spear option and other than that you can grab the Barnacle or the Phazer to make your life easier. I use the star from area #5 for this one, by just grabbing it and getting back + down where I can get a lot more kills.
Area #5 - It contains only a single Elite and 3 enemies… it has to be done, because of the extra points, but it’s one of the most disappointing areas I’ve ever seen.
Area #6 - Pretty straight forward with a giant Acid Pit, so if you are cursed - there’s no way of passing through.
Alternative Route - If you can’t get the War Spear, you can go Areas #2,1,3,4,6,5
Pick up the Fire Grenade before you go left right from the start for Area #2
Don’t forget to grab the star from area #5 before going for the Barnacle/Phazer in #4 pick up.
Leaving #5 for last, because it barely gives any score and you might not have enough time to finish the Boss
Boss Fight - LUL
At time of posting #1 in the scoreboard in 30-40 tries >
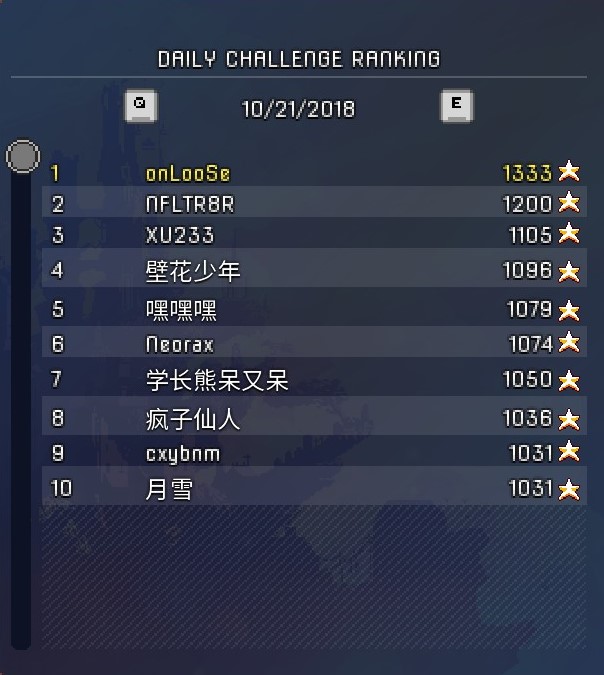
GL HF and take care!
9 Likes
Looks like they’ve figured out some way to deal with all the cheaters and now you’re consistently on top, well done mate.
4 Likes
i thought you wrote
i liked that narrative much more
onloose the vigilante
6 Likes